Streembit

1.White paper
1.1.Abstract
Streembit is a decentralized, peer to peer (P2P), permissionless, real time communication system for humans and machines. The application aims to implement a system that securely manages humans to machine and machine to machine (M2M) communication without using a central server or client-server infrastructure. The actors of the system
both human users and Internet-of-Things devices – are the nodes of the Streembit peer-to-peer network. The system uses a distributed hash table (DHT) for contact discovery services. The system ensures data integrity using public-private key cryptography. Messages are signed with the contact’s private key on the client side using ECDSA cryptography. The data is encrypted using 256-bit AES symmetric encryption. The symmetric keys are exchanged between contacts using ECDH key exchange. The video and audio communication between contacts uses the WebRTC protocol that allows end-to-end encrypted video and audio conversation in a true P2P manner. For all use cases the system end-to-end encrypts the communication between the peers without routing the conversation through any central server.
1.2.Background
Internet-of-Things refers to the network of uniquely identifiable embedded hardware devices accessed through the Internet infrastructure. Internet-of-Things devices are normally semi-autonomous, wireless devices participating in internetworked communications using the familiar and established TCP/IP protocol stack. Typical applications are sensory equipment which, without the need for extra wiring, can collect and relay data to a central host – either on premise or in the increasingly popular cloud environment. The interconnection of these embedded devices is expected to usher in a new era of automation in nearly all fields. It enables advanced applications such as smart grids, remote surveillance systems, wireless heart monitors and many more.
According to Gartner, there will be nearly 26 billion devices connected to the Internet -of-Things by 2020. ABI Research estimates that more than 30 billion devices will be wirelessly connected to the Internet-of-Things by 2020. Per a recent survey and study done by Pew Research Internet Project, a large majority of the technology experts and engaged Internet users who responded, 83 percent agreed with the notion that the Internet-of-Things and embedded and wearable computing will have widespread and beneficial effects by 2025.
We focus on the following areas by implementing the Streembit system:
1.2.1.Security
Human-to-human digital communication and Internet-of-Things devices need to have some form of connectivity,
resulting in significant security issues that businesses and residential users need to consider. The connected devices
require a security protocol and its security policy should be in line with best security practices. These Internet
connected devices can easily expose businesses and homes to various security threats. At the same time there is no
common, standardized, robust and proven authorization and access control protocol in existence for Internet-ofThings devices. Of the numerous service providers rolling out devices and services, almost all of them implement
their own security protocol, API and infrastructure. Consequently the development of custom security
implementations increases the price of the product and the lack of standards increases the security risks. The
standard way would be to secure the communication and manage Internet-of-Things nodes from an authorization
perspective using the robust, widely adopted and well tested public/private key infrastructure (PPKI). To ensure
confidentiality and secure communications, the core part of security should ideally be based on PPKI paired with
some kind of PPKI certificate management. Existing systems tend to use custom authorization and access control
schemes with domain specific login portals for user name/password based logins instead of using robust PPKI based
security. Using the public/private key infrastructure would pave the way for the deployment of a robust and secure
authentication and access control scheme. The parties are identified by their public key. The authenticity of
messages and the identities of the actors are then verified using PPKI cryptography routines. Using the wellestablished public/private key infrastructure based security scheme would greatly simplify the authentication, access
control and identity management aspects of Internet-of-Things security
1.2.2.Data Control
From a user perspective, this is one of the more significant barriers to the large-scale adoption of Internet-of-Things.
Data control is commonly mistaken for data ownership. In a conventional computing system the issue was who owns the data. In Internet-of-Things the challenge is about deciding who gets access to the data. Enabling access to
private data is a serious concern from a privacy standpoint.
1.2.3.Standards
There is almost as much software systems as there are Internet-of-Things device manufacturers. The lack of open
standards are directly affecting the adoption rate of Internet-of-Things devices as well having a negative impact on
the user experience. Well-documented and robust APIs by providers could be a step towards open standards, but so
far no such API usable by Internet of Things devices exists. Sensors use custom APIs instead. Such domain specific
product development dramatically slows down innovation as development resources are allocated to custom software
development. This once again increases the price of the product and consequently lowers the adoption rate of these
modern devices.
1.2.4.Decentralised, block-chain based technology
Block-chain is a transaction database and ledger shared by all nodes that are normally participating in a digital
currency system. A full copy of a currency’s block-chain contains every transaction ever executed regarding to the
currency. The block-chain can also perform distributed contracts. Such contract management is a method to form
agreements between parties via the block-chain.
IDC recently concluded that block-chain technologies could be key tools for confirming data origin and accuracy,
tracking updates and establishing true data authority for millions of different data fields. The block-chain is a solid
model for establishing an audit trail, in addition to transferring and monitoring distinct entities that represent items of
value. As a result, block-chain has the potential to serve as a foundation for improving the authenticity and accuracy
of business and government records. A block-chain based system can track activities via a shared record that’s
resistant to hacking and unauthorized changes. Once this shared version of the “truth” is established, via a peer-topeer network, multiple nodes ensure the integrity remains intact even as new records are added.
1.3.The Streembit System
1.3.1.System overview
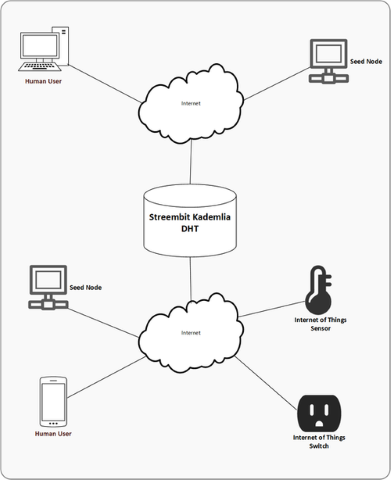
The Streembit system forms a decentralized peer to peer overlay network to manage connections between human and Internet of Things peers. The participants in the network are the peer nodes. The peer to peer network is scalable and an unlimited number of nodes can participate in the network.
The system performs public private key infrastructure based authentication and access control functions to securely connect peer nodes. The application generates at least one private/public key pair on each peer node including on the Internet-of-Things devices. The actors of the system publish their public keys to the peer to peer network via a Kademlia distributed hash table (DHT). Each peer node knows the public key of the other connected peer nodes. The system identifies peer nodes in the peer to peer network by their public key. To ensure data integrity the nodes sign the messages with their private key. The nodes sign all messages – there are no unsigned messages circulated in the system. The requirement for signing the messages also help to mitigate the risks of Sybil attacks and DDoS attacks.

Streembit supports two types of network implementations, public and private Streembit networks. The main purpose of both network is the facilitate contact information exchange. The difference between them is the accessibility of the networks.
Public network. Anyone can connect to the public Streembit network. All valid, signed, cryptographically verified messages from any node are registered in the DHT. A node that is connected to the network can receive any messages from any other node. As the main purpose of the network type is to facilitate node discovery, humans and machines can find each other on the network in a decentralized manner, without using a corporate owned centralized system. Nodes publish their availability and network information such as IP address and port information in encrypted form using their contacts’ ECDH public key. The DHT acts as a ledger to exchange contact information. The participating nodes of the network are the workers who route the information to any new connecting nodes upon request. The main Streembit network is public.
Private network, private hub. Decentralization addresses many infrastructure issues such as high availability and scalability. A decentralized system can achieve that by forming a collaborative network from the participating nodes. The democratic, libertarian concept of decentralized computing assumes that the nodes contribute to the network by routing messages to other nodes. The participating nodes keep alive the decentralized network by interacting with other nodes. A decentralized network provides users with many benefits, and in exchange for the benefits the nodes must route messages on the network. The issue is, potentially there are millions of nodes in a large decentralized network. At the same time, a limitless interaction with any node is not allowed id many use cases. For example, it is not optimal nor practical from resources viewpoint if an Internet of Things enabled garage door controller of a family home acts as a full node on the Streembit network. A full node by definition routes any messages to any connected nodes. A low power garage door controller device that is dedicated to one task – i.e. open the garage door upon the request of an authorized user – should not perform such message routing function. An IoT gateway of a family home or a communication network of a business should exclude actors from the communication that aren’t part of their particular use case. Therefore, we have introduced the private network on the DHT concept in Streembit. The nodes of a private Streembit network uses the public Streembit network for a one-time information sharing: they publish their encrypted IP address or multicast DNS name, and then immediately disconnect from the public network to wait for the connection of their private node partners via the private network. Terms of authentication and access controls schemes a private Streembit network is isolated from the public Streembit network. That means only certain peer nodes are allowed to connect to the private Streembit network. A private Streembit network is functioning as a firewall: only preconfigured contacts allowed to connect. The collection of the preconfigured contacts is maintained in a lookup list. The connection of devices and users which are not in the preconfigured list is refused by the private network. The access control is governed by built in authentication functions. Typically, IoT devices within a building, teams, communities or businesses would run a private Streembit hub to establish an even more secure communication mechanism than the public Streembit network does.
1.3.1.1.Streembit Kademlia DHT
Kademlia is a distributed hash table (DHT) for decentralized peer -to-peer computer networks. It specifies the structure of the network and the exchange of information through node lookups. Kademlia nodes communicate among themselves using UDP or TCP. Streembit primarily uses TCP. A virtual or overlay network is formed by the participant nodes. Each node is identified by a number or node ID. The node ID serves not only as identification, but the Kademlia algorithm uses the node ID to locate values. The node ID provides a direct map to message hashes and that node stores information on where to obtain the file or resource. We selected this implementation as using public/private key cryptography allows a simple and at the same time robust authentication and access control (i.e. to identifying the node by verifying the public key based signature on messages). Having the public key validation integrated into the DHT layer allows the filtering of malicious nodes prior the messages reach the application layer. We extended the generic Kademlia protocol and Streembit adds an extra security layer to the DHT to validate and authenticate messages using the ECC public key of users and devices.
The Streembit distributed has table primary role is to manage user/device discovery on the Streembit network. One of the main problems in IoT device management is how to share the characteristics of a device, like serial number, manufacturer and model with other devices or human users. Sharing device information is required for installation, data retrieval, device management, and device control. Streembit is a network that provides a means to safely install, configure, find and connect massive amounts of IoT devices together, and at the same time minimizing the risk that devices get hijacked. In order to achieve this the Streembit network implements distributed registry that allows simple access to private and public devices without risking their integrity.
1.3.1.2.Node ID
The node ID of the nodes could be calculated different ways. The most common method is calculate the node ID based on the public key of the node. The system hashes the public key using SHA-1 to create the node ID.
Certain nodes can create the node ID based on their IP address and port that the Streembit application uses. The node ID is the result of the SHA-1 hash of the IP address and port.
1.3.2.Contact management on the Streembit network.
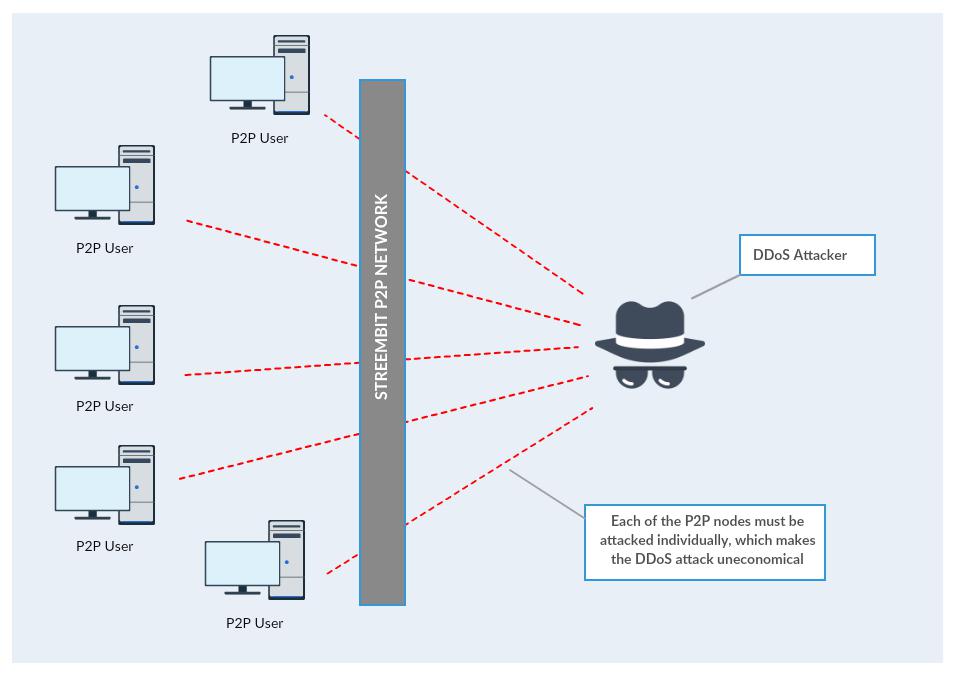
From security, authentication and access control standpoints contact management and how users find their contacts (i.e. finding other peer nodes on the Streembit network) are key functions in Streembit. Client-server, centralized systems such as Skype or Signal provides users with convenience in contact management. However, users pay a heavy price for such easy to use and convenient systems by giving up their privacy to the centralized application providers and their associated government surveillance entities. Hardly a day goes by without a news that hackers, cyber criminals and industrial spies compromised the network of centralized providers. On the other hand the permissionless, cryptographically secured and decentralized Streembit DHT isn’t an economical attack target. Attackers can deny access for millions of users by paralyzing a DNS server. To succeed with an attack on a P2P network the attacker (e.g. a hostile government) must deny millions of peers one by one. Since there is no central service provider in a P2P network each of the nodes must be attacked directly. This makes the attack on a P2P network highly uneconomical. To secure the network and communication we aim to keep the communication between contacts truly peer -to-peer. This makes less feasible that government surveillance, industrial spies and criminals could compromise the network and data.
There are the following base premises in Streembit P2P contact management:
-
The peers who wish to communicate with each other must exchange their PPKI public keys to enable ECDH key exchange methods
-
All data exchanges must be signed to guarantee data integrity and encrypted to guarantee privacy.
-
The contacts publish to each other their network information that is typically their IP address and port
-
The public DHT storage can hold only encrypted contact related data
-
Communication and access to contacts can be terminated any time
There are two methods to establish connection to contacts:
-
Offline contact request. Users create a contact offer by clicking on the Contacts/Create offline contact menu item, and exchange contact offers offline by sending it to each other by email, external chat, phone SMS, postal mail, HAM radio, etc. The contact offer is accepted by clicking on the Contacts/Add contact menu item.
-
Centralized contact request. This method uses the configured WebSocket hub to find the contact by clicking on the Search magnifier icon of the Contacts tab.
Naturally, we strongly recommend that users make connection via method “a”. During method “a” the peer crates an offline request A typical offline contact offer appears the following.
{
“account”: “testuser01”,
“public_key”: “45GnKeY77xct9BT3Hz55Db111mSEBKB6ARWbXctoB3UR8p75GYjtMhmx6CSZjRENvYdGG…”,
“transport”: “ws”,
“port”: 32318,
“host”: “www.streembit.org”,
“user_type”: “human”
}
This contact offer is wrapped in a base64 string in the following format (the actual content is shortened here):
— BEGIN STREEMBIT CONTACT OFFER —
eyJ0eXAiOiJKV…..
— END STREEMBIT CONTACT OFFER —
1.4.Streembit Security
The cornerstone of Streembit security is elliptic curve public/private key cryptography infrastructure (PPKI). PPKI allows the implementation of robust security. We use PPKI to identify the entities of the system (based on their public key and PPKI signature), perform authentication, and ensure data integrity (using cryptography signatures).
Using the public/private key cryptography infrastructure paves the way for the deployment of a robust, secure authentication and access control scheme. The parties are identified by their public key. The authenticity of messages and the identities of the actors are then verified using PPKI cryptography routines. Using a PPKI infrastructure based security scheme greatly simplifies the authentication, access control, and identity management aspects of Internet-of-Things security.
The elliptic curve cryptography (ECC) scheme is particularly suitable for IoT devices. The small footprint of ECC allows security modules to be implemented on embedded devices. ECDH is a trusted and proven key agreement protocol. Using the ECDSA digital signature algorithm ensures data integrity.
The system performs public/private key infrastructure based authentication and access control functions to securely connect machines to machines or machines to humans. The Streembit security module of the IoT device must generate at least one public/private key pair for each connected IoT device. Human users generate their ECC public/private key pair when they create their account. The actors of the system publish their public keys to the network, where each entity knows the public key of the other connected human or machine. The system identifies each of the entities by their ECC public key.
The collision resistant SHA-256 hash function is used to create a hash of data which can be signed using the private key to guarantee data integrity, as well as provide information about the originator of the data. To ensure data integrity the messages, control commands, event data, requests, and responses are signed with the ECC private key; the signature can be verified using ECDSA. To ensure integrity of data, each entity must sign all messages with their private key. The messages in the Streembit network are based on the following standards: JSON Web Token (JWT), JSON Web Encryption (JWE), and JSON Web Signature (JWS).
The basic premises of the Streembit security are
-
Human users and Internet of Things devices use public/private key (PPK) infrastructure and PPK cryptography functions to secure messages
-
Each actor of the system must generate a public/private key pair. (Typically keys are generated prior to configuring the device and will be burned into the devices’ firmware).
-
The device or user publishes the public key to other users of the system.
-
The data integrity and authenticity of the messages is guaranteed with PPK signatures.
-
Each session between users is secured with strong symmetric cryptography keys.
-
All messages between users are secured with 128-bit and 256-bit AES symmetric encryption/decryption.
-
The system uses elliptic curve Diffie Hellman (ECDH) key exchange algorithms to facilitate the exchange of session keys.
1.4.1.Protecting the ECC public/private key pair
The ultimate issue of all applications, systems and devices that encrypt data is the protection of the cryptography symmetric key or protection of the private key of the public/private key pair. Similarly to the iPhone and PGP, which both use passcode to protect their keys, Streembit requires users have a passcode to protect their PPKI private key. The Streembit passcode that protects the user’s PPK key pair is relatively complex and it requires the following
minimum number of iterations with a brute force attack:
262×10×33×954× 8!4! ≈ 3.05 x 10¹⁶
That means 3,050,000,000,000 (3.05 trillion) times more iterations than the 104 iterations is required to break the latest iPhone security. (Of course if the passcode is longer than 8-digit then the number of iterations is even more). Please note, this is related to protecting the PPKI key pair. To protect real time communication, Streembit uses a randomly generated 256-bit AES session key and exchanged between peers with a randomly generated ECDH key pair. This means that real time communication, which is the main functionality of Streembit, is secure even from the brute force attacks of NSA super computers and large zombie computer clusters of cyber criminals.
1.4.2.Mitigate the risk of Sybil attacks
A known issue with regards to peer-to-peer (P2P) networks and their practical limitation is that they are frequently subject to Sybil attacks. This means that malicious parties can compromise the network by generating and controlling large numbers of shadow identities. A malicious node may present multiple fake identities to a peer-to-peer network in order to appear and function as several distinct nodes.
A Sybil attack is most effective on anonymous and reputation systems where if the malicious nodes outnumber the honest nodes the outcome of the application could be compromised. For example, on a file sharing network a successful horizontal Sybil attack allows the attacker to sniff most of the control messages, hijack the system, and deliver bogus content.
Contrarily, Streembit facilitates communication between contacts that you know, such as your family members, teammates, and business partners. You are also aware of the location and identity of your Internet of Things device(s) you control via Streembit, lessening the likelihood of a Sybil attack. Malicious nodes, regardless of their weight and presence on the network, are unable to change the public keys of your contacts (as the public key is based on the cryptographically secured PPK infrastructure).
Additionally, Streembit introduces another layer of security, private networks. Using private networks, the public keys of the contacts are loaded to the seed nodes manually; mitigating further the risk of a Sybil attack as well as a Man-in-the-middle attack (MITM). A Sybil attack, which generally speaking is a serious security issue for P2P networks such as file sharing applications, is much less of a problem for the Streembit P2P system.
1.4.3.Support for GCM
Streembit will support and implement GCM. Galois/Counter Mode (GCM) is a block cipher mode of operation that uses universal hashing over a binary Galois field to provide authenticated encryption. It can be implemented in hardware to achieve high speeds with low cost and low latency. Software implementations can achieve excellent performance by using table-driven field operations. It uses mechanisms that are supported by a well-understood theoretical foundation, and its security follows from a single reasonable assumption about the security of the block cipher.
There is a compelling need for a mode of operation that can efficiently provide authenticated encryption at speeds of 10 gigabits per second and above in hardware, perform well in software, and is free of intellectual property restrictions. The mode must admit pipelined and parallelized implementations and have minimal computational latency in order to be useful at high data rates. Counter mode has emerged as the best method for high-speed encryption, because it meets those requirements. However, there is no suitable standard message authentication algorithm. This fact leaves us in the situation in which we can encrypt at high speed, but we cannot provide message authentication that can keep up with our cipher. This lack is especially conspicuous since counter mode provides no protection against bit-flipping attacks. GCM fills this need, while no other proposed mode meets the same criteria.
1.4.4.Mitigate the risk of DDoS attacks
Distributed denial-of-service (DDoS) attack is designed to knock web sites, systems and services offline. For instance, the enormous power of the September 2016 cyber-attacks paralyzed the Internet along the US East Coast. The attack created problems for Internet users and afflicted an array of sites including Twitter, Amazon, Tumblr, Reddit, Spotify and Netflix. It was an extremely large and unusually distributed denial-of-service (DDoS) attack designed to knock many popular sites and services offline. The power of first attack reached 1.1 Tbps while a follow-on was 901 Gbps. The DDoS attacks were delivered through a collection of hacked Internet-connected cameras and digital video recorders. No centralized, client-server network can withstand such powerful attack. No wonder the attack left millions of Twitter, Amazon and Netflix users without software services.
We argue that the only logical and available solution against such attacks is a decentralized peer-to-peer system. DDoS attack on a decentralized, P2P network wouldn’t be effective – no wonder Bitcoin has never experienced a network outage since the inception of the network. In order to paralyze many millions users of a client-system server the attackers have to concentrate their attacking power only on the centralized server. Once the attackers take out the server the clients (users) are without service. It is a relatively simple and doable task from the attacker’s viewpoint and a very economical one as well – one concentrated attack can affect millions of users. However, since there is no central server present in a P2P network, to deny the service the users of a decentralized, P2P network would have to be attacked individually. The DDoS attacking power would have to be divided to attack each peer separately. This defies the economy of the attack. Therefore the configuration and orchestration of such attack on a P2P network would be impractical and highly uneconomical.
(Please refer to the diagrams below)
Attack on centralized services

Attack on a P2P network
1.4.5.How secure the cryptography of Streembit?
Both 128-bit and 256-bit AES symmetric encryption, the cryptography schemes of the messages in the Streembit network, are safe from any brute force attacks. Bruce Schneier points out: “These numbers have nothing to do with the technology of the devices; they are the maximums that thermodynamics will allow. And they strongly imply that brute-force attacks against 256-bit keys will be infeasible until computers are built from something other than matter and occupy something other than space.”
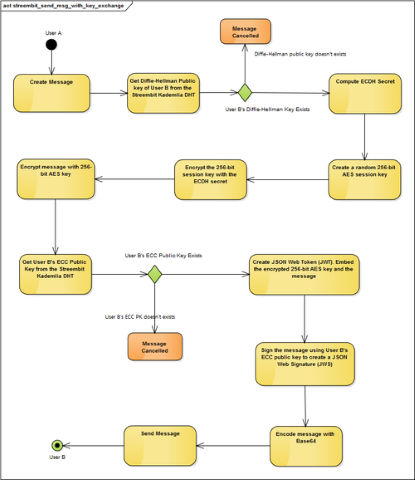
The following UML diagram describes the key exchange using ECDH and securing the message with 256-bit AES symmetric key between “User A” and “User B”

1.5.Streembit Blockchain
The RPC commands follow the Bitcoin RPC command naming convention.
To understand what the commands do please refer the the Bitcoin RPC command documentation.
1.5.1.Blockchain Client
No special configuration required to run streembit-cli in “Blockchain Client” mode. All it takes to execute blockchain command is to properly write such a command in console/terminal. If you familiar with Bitcoin‘s native bitcoin-cli command line application you have an idea on how the client is working. it sends one command at a time to the streembit-cli application running in Blockchain Node mode. Blockchain Node in turn processes this command and sends back output that will be displayed on the client’s side
Here in the json tab you can see the list of commands currently supported by streembit-cli running in Blockchain Client mode.
        'addmultisigaddress',
        'backupwallet',
        'createrawtransaction',
        'decoderawtransaction',
        'dumpprivkey',
        'dumpwallet',
        'encryptwallet',
        'getaccount',
        'getaccountaddress',
        'getaddressesbyaccount',
        'getbalance',
        'getblock',
        'getblockcount',
        'getblockhash',
        'getinfo',
        'getnewaddress',
        'getrawtransaction',
        'getreceivedbyaccount',
        'getreceivedbyaddress',
        'gettransaction',
        'gettxout',
        'importprivkey',
        'listaccounts',
        'listreceivedbyaccount',
        'listreceivedbyaddress',
        'listsinceblock',
        'listtransactions',
        'listunspent',
        'listlockunspent',
        'lockunspent',
        'sendfrom',
        'sendmany',
        'sendrawtransaction',
        'sendtoaddress',
        'setaccount',
        'settxfee',
        'signmessage',
        'signrawtransaction',
        'submitblock',
        'validateaddress',
        'verifymessage'
Shell tab to the right contains a template that you can use to compile a valid blockchain command
node streembit --rpcuser=youruser --rpcpassword=yourpassword COMMAND PARAM1 PARAM2 ...
All these RPC related flags are followed by a command and parameters if the command requires the parameters.
You can also see a short help by entering
Please, notice that running streembit-cli in Blockchain Client mode does not require –pwd flag (so, password)
1.5.2.Blockchain Node
This is a part of streembit-cli application that listens for and processes messages from Blockchain Client.
To activate this mode you need to edit your configuration file. Refer to modules section and then down to blockchain module. Turn run value to be “true” and add the following “key:value” pairs to this section (see the example in json ).
{
  "name": "blockchain",
  "run": true,
  "rpcuser": "bctest",
  "rpcpassword": "qawsed",
  "rpcallowip": [
     "127.0.0.1"
  ]
}
Where,
rpcuser – username that will be compared to a corresponding value in the request from Blockchain client
rpcpassword – password that will be compared to a corresponding value in the request from Blockchain client
rpcallowip – this is a list of IP address that we will consider as clients with request privileges granted
1.6.Internet-of-Things Device Handling
It is troubling that robust security was not taken into account with the majority of Internet of Things implementations. The data of IoT devices are being harvested in an automated fashion but who has access to the data? What functions can a human or another machine execute on the IoT device? Is my office door actually being opened by a former employee who is not supposed to enter the premise anymore? Is the data being forwarded by the IoT device compromised at all during its way to the end-user, never mind whether or not it was sent by the actual device and not in fact by an intruder?
Streembit manages device discovery as well as authentication, access control and provisioning of devices without using a centralized authority server. The system facilitates device discovery and device control in a peer to peer manner. For many IoT use cases a decentralized, P2P network topology is the most secure, robust, scalable and reliable method of operation. Instead of using expensive corporate owned third party cloud systems, Streembit manages Internet of Things devices without the need of proprietary centralized cloud platforms.
Centralized, corporate owned cloud is certainly an easier way to build out IoT platforms. However, the owners and authorities in these topologies all have an influence upon the network and can be exploited. They can ban devices, spy on devices and compromise data integrity of devices. In fact, government can order them to do any or all of these. In the near future, the doors of your garage and home, air conditioning units and your home security system will be fully internet connected. You will be able to control your home automation system from your mobile phone. It is essential that only you can control your IoT devices. Streembit excludes third party service and cloud providers from the ecosystem to give full control to the end users over the devices.
The Streembit IoT implementation is based on open standards. The Streembit developers contribute to the standardization process of W3C Web of Things Interest Group and mirror all W3C open IoT standards in the Streembit source code.
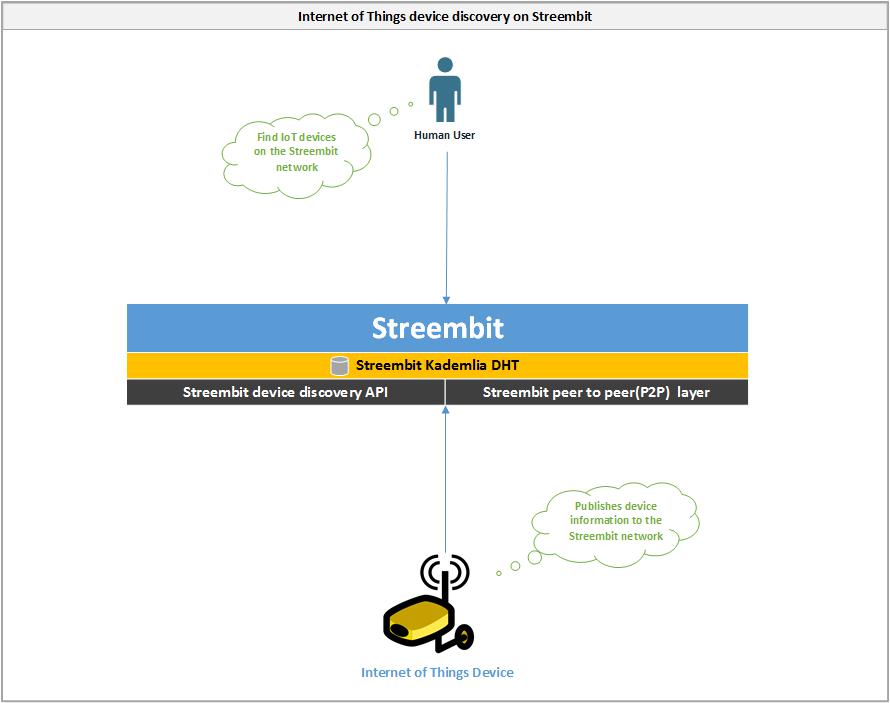
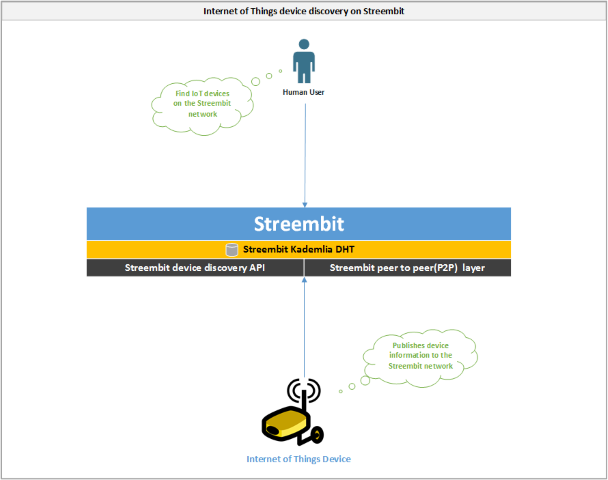
Internet of Things device discovery on Streembit
Streembit allows IoT application providers and context producers to register their IoT Objects on the decentralised Streembit network, and in turn allow context consumers to discover them in a secure and peer to peer manner.
Example data structure for device information:
{
“account”: “058dd8eb72d1936df31eebdd9afb49e1415787e3”,
“public_key”: “03e9a353b86cc482af497a8afb56209ee35eaa80bee228c2af8ce48747b90c50e7”
}
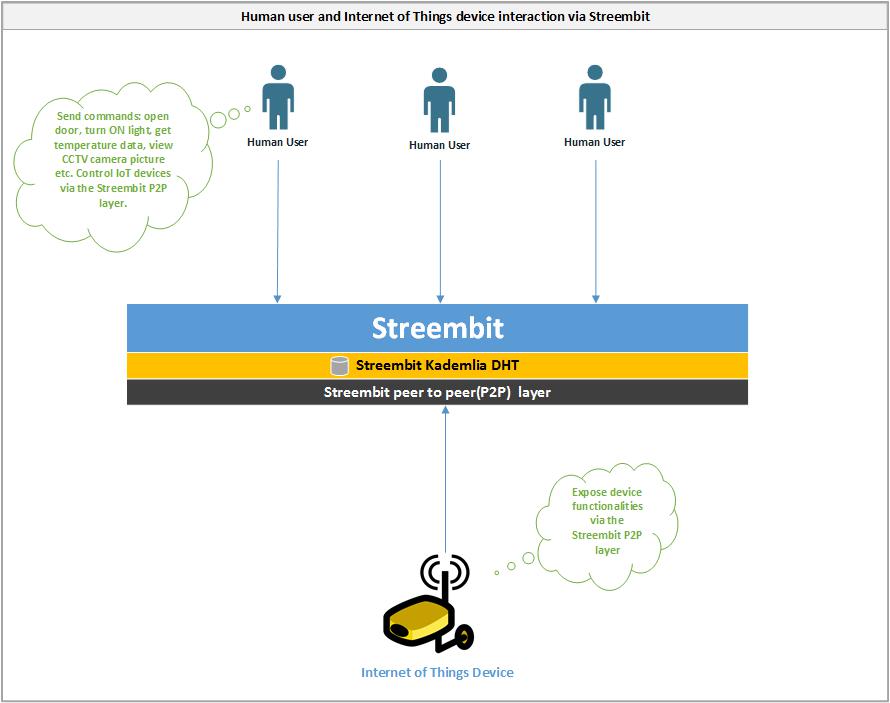
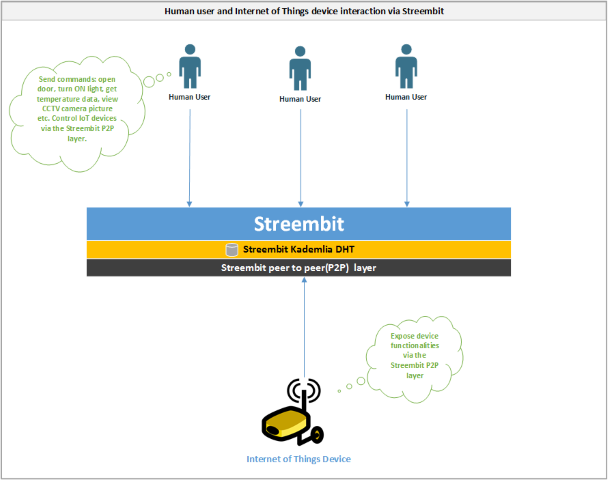
Control Internet of Things devices via Streembit
-
The Internet of Things devices and human users communicate with each other directly in a peer to peer manner
-
The data is end to end encrypted between the human user and IoT device. The encryption key is shared only between the user and device – never with any third parties.
-
The device exposes functionalities via the Streembit network and user interface using W3C WoT standards
-
The user interacts with the device via the Streembit P2P layer and UI. For example, opening a door, turning ON a light, controlling motor speed, getting temperature data, viewing CCTV pictures etc. all peer to peer, without a centralised solution and via the Streembit user interface.
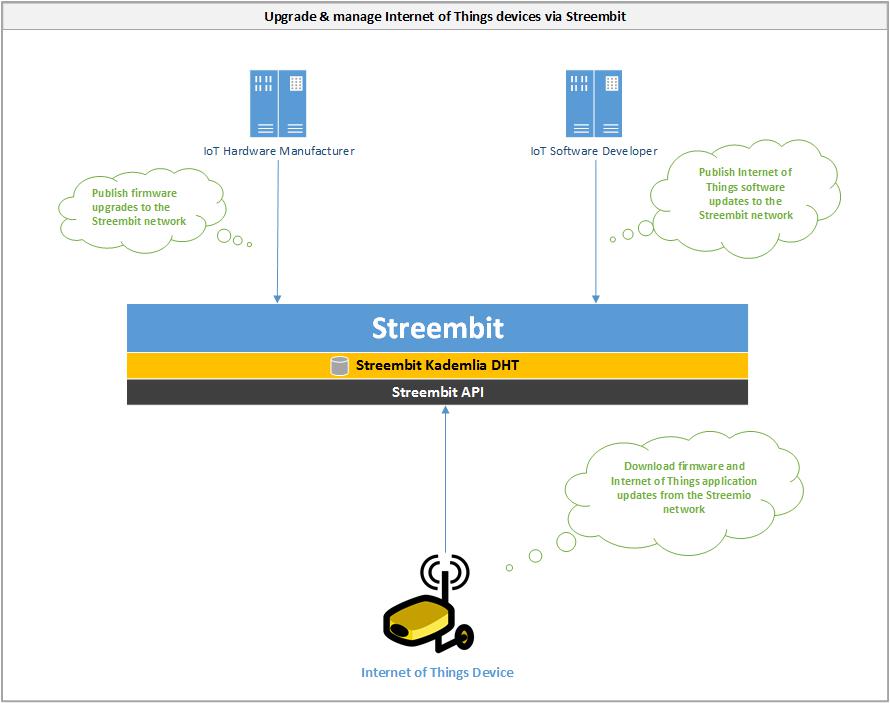
Upgrade and manage Internet of Things devices via Streembit
-
Hardware and software providers upgrade Internet of Things devices on the always up and running Streembit network.
-
Internet of Things device manufacturers and software designers publishes firmware and software updates via the Streembit network.
-
Internet of Things devices run the Streembit system and ensure the origin and data integrity of the updates by verifying the public key of the publisher.
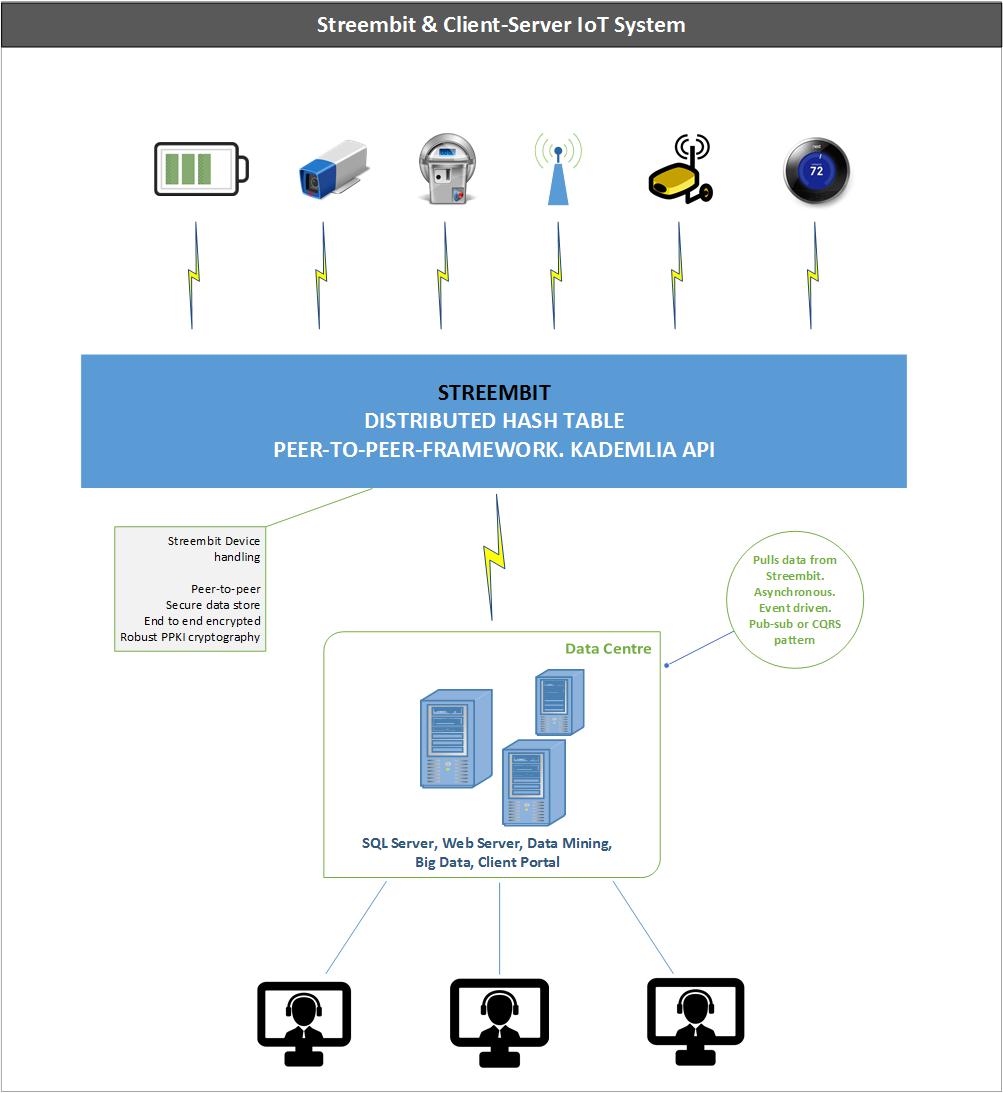
1.7.Interface with legacy client-server systems
Why should anyone switch to the completely new decentralized, peer-to-peer topology from the well tested client – server paradigm? Why should a business throw away the existing infrastructure and invest into a new one? After all, the businesses have already invested into MS SQL, PostgreSQL, etc. data stores. Businesses use already centralized data mining and data analysis applications; client portals to serve end users via web applications – why should any business throw that away?
We don’t suggest that businesses replace the existing system with a completely new one. Streembit complements and fits into your existing IoT infrastructure. It takes away the heavy load of device handling from existing centralized server based application.
A central server that connects to IoT devices is a mission critical component. Centralized servers that communicates with devices are single point of failure. Any mission critical components must address scalability and high availability business requirements using expensive load balancing, clustering hardware and software applications. Also, a centralized server that receives device communication is a convenient target for cyber criminals and attackers.
Alternatively, IoT devices can publish the data to the always available and economical Streembit distributed hash table rather than writing the data to a centralized web service or TCP/IP server. Then, the server can pull the data from the distributed storage. In this loosely coupled system the central server doesn’t have to be a mission critical, 99.999% uptime component. It can be a lightweight system that pulls the data from the distributed storage. The topology we propose is an event driven, asynchronous mechanism, pub-sub messaging and it implements the separation of concerns (SoC) design principle. The devices publish the data to the distributed storage and aren’t concerned about the existence of the server. In such a topology the central server is not a single point of failure in the system anymore.
Streembit can manage in this set-up:
-
Secure device authentication and access control
-
Secure messaging between the device and server
-
Secure device upgrade and management
We propose to delegate device handling tasks and processes to the peer-to-peer network. In case the commercial/industrial use case requires real time communication, it can be done via peer-to-peer and without the need of a central server.
1.8.Autonomous vehicle management with Streembit
Studies indicate autonomous vehicles will reshape car finance and how customers use cars http://bit.ly/2ng9MPi. The vehicles will be shared by users through a pay per trip business model. One of the biggest challenges that currently exists to support the adoption of autonomous vehicles is to create a cost effective and flexible way to create a secure connection, and in effect create a cyber safe connected vehicle.
Innovative solutions and concepts are being created by manufacturers and their supply partners yet currently all of these potential new business revenue streams cannot be delivered if there is a risk to the car buyers and brand reputation if these new solutions are proved to be unreliable and insecure.
The complexity of the technology and processes involved in connected cars is what makes the task of the developer of security software so difficult. Cars now have many systems for sending and receiving information, and they are all vulnerable to attack. So are the back-end systems that process the wealth of data the car sends out. No wonder
consumers are becoming increasingly aware of the difficulty of keeping their brand-new cars secure.
We propose Streembit as the foundation of a secure communication layer for the infrastructure of the vehicle to ensure compliance and also the separation of concerns between user data and the connected devices managed in the vehicle. A decentralised secure peer-to-peer network of vehicles and their sub systems, such as human – machine – interface and advanced driver assistance systems which are key parts of an autonomous vehicle architecture, could provide BMW with a competitive advantage. This translates into strong security and cyber safe vehicles while achieving these objectives in a scalable and cost effective manner.
Streembit can manage autonomous, self-driving vehicles. The following tasks relevant to self-driving vehicles can be managed by our system:
-
Publish, manage and provide access to insurance, owner, operator info, and safety certificates
-
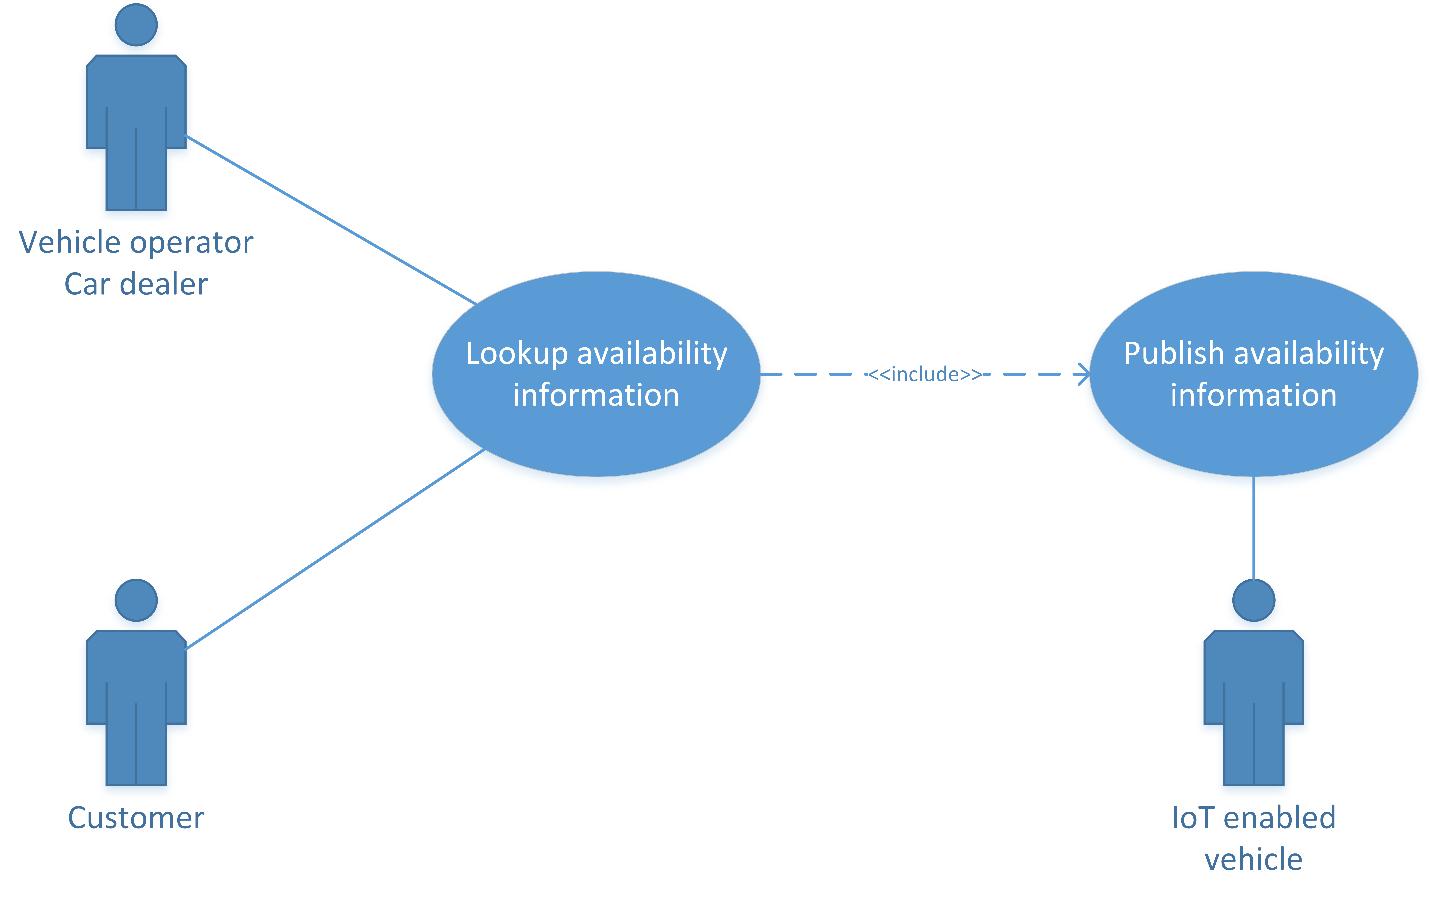
Publish, manage and provide access to route, destination, and availability information
-
Booking and selling of spaces in the vehicle via a secure and scalable peer-to-peer trading platform
-
Manage the identity of vehicles and human users using cryptographically secured certificates
-
Preserve privacy. Users can define what data is available for data mining and data analysis
-
Audit the transactions on the blockchain to comply with law enforcement and regulatory requirements
-
Audit the vehicle activity so that BMW and insurance companies have the operational data at hand
-
Interface with BMW data warehouse for data mining and data analytics
-
Interface with third party Internet-of-Things devices (e.g. electric car charging stations)
1.8.1.Detailed functionalities
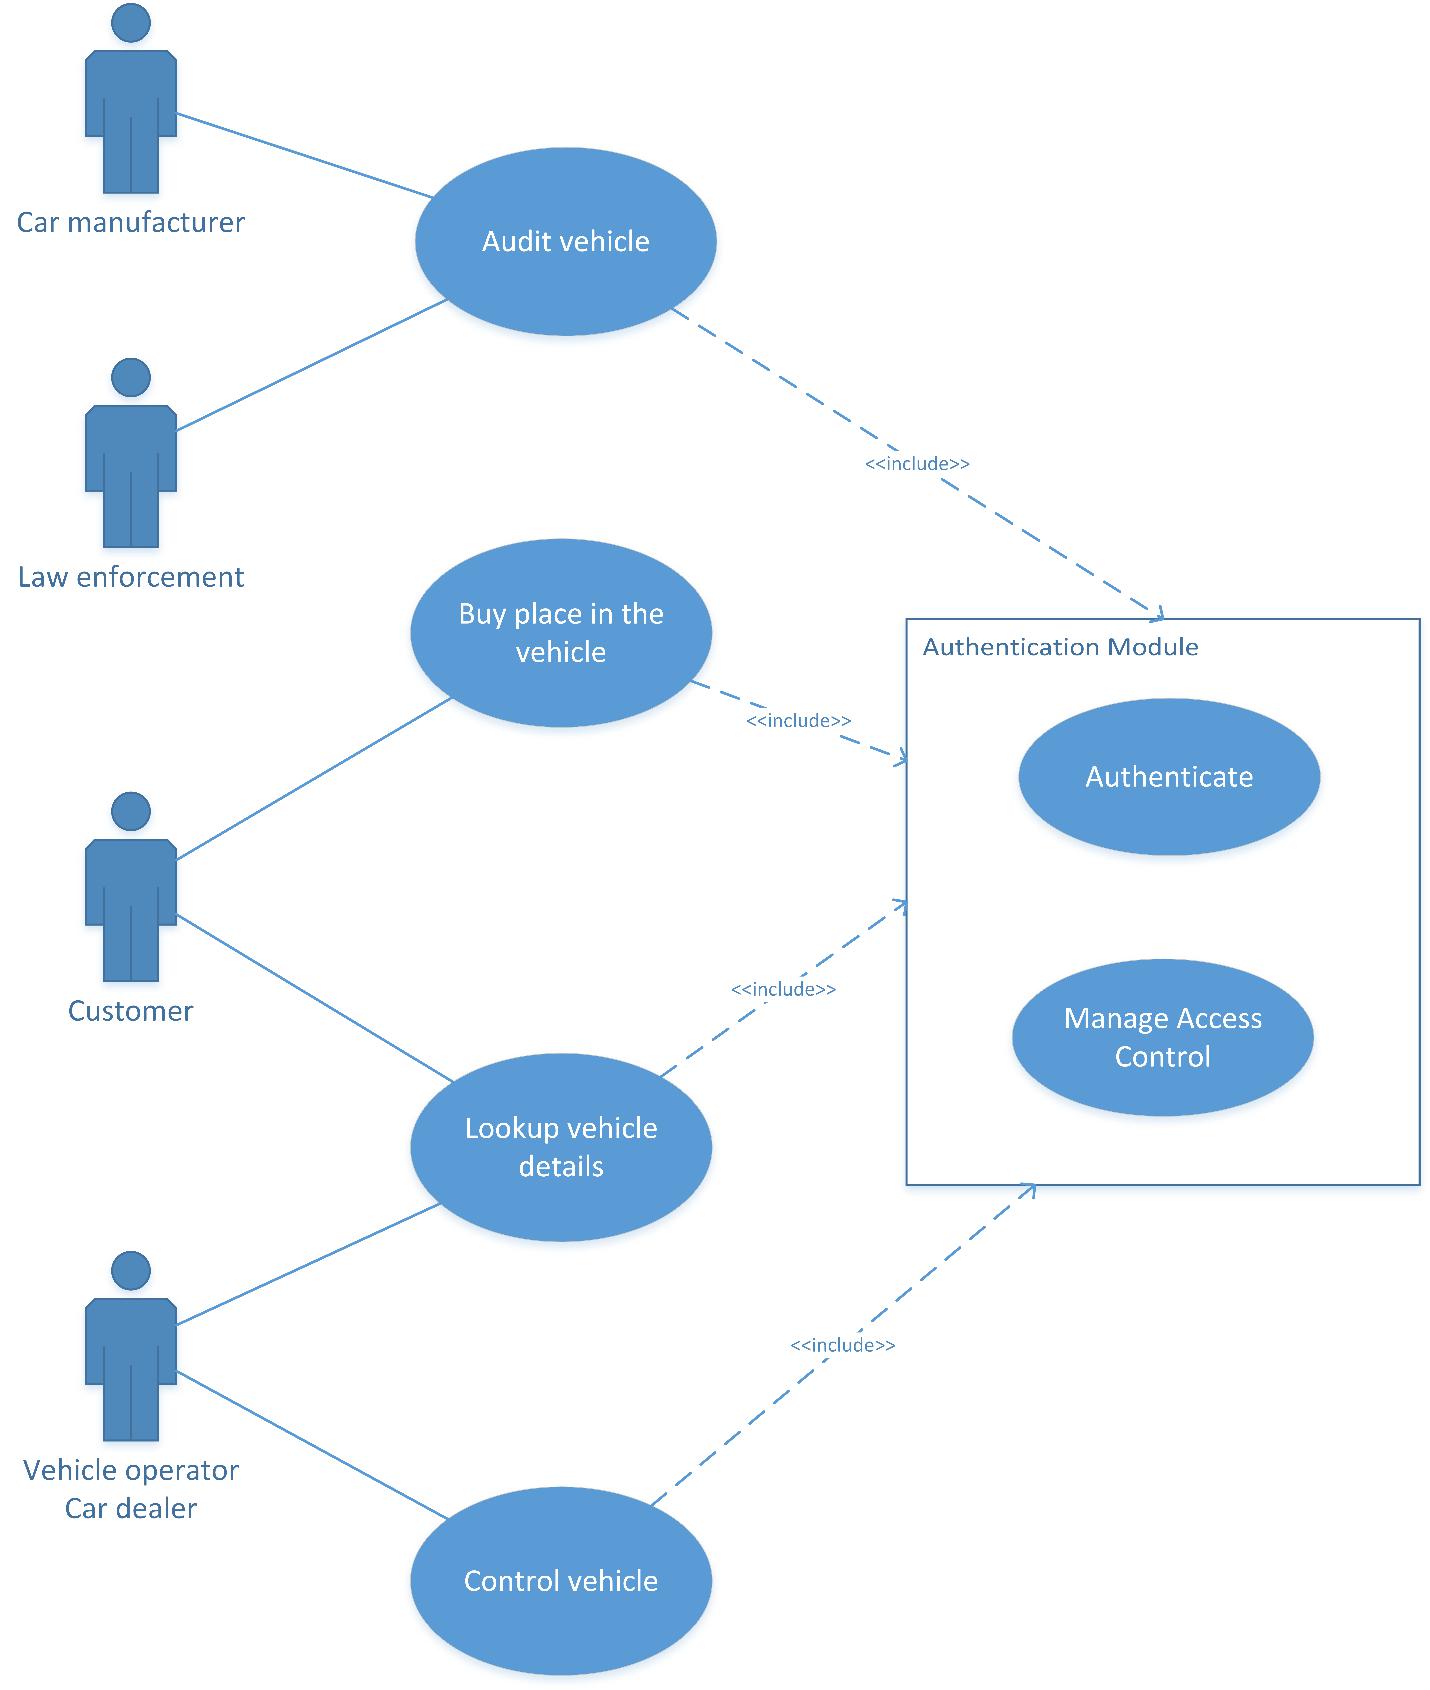
Authentication and access control
Using PPKI and cryptographically verifiable signatures, this solution would mitigate the dangerous consequences of an attacker gaining wrongful access to a vehicle, device, or sensitive information, through spoofing an identity. Only the holders of the corresponding private keys will have access or control of the vehicles they own. This could also be used to keep communication between BMW employees and management away from prying eyes.
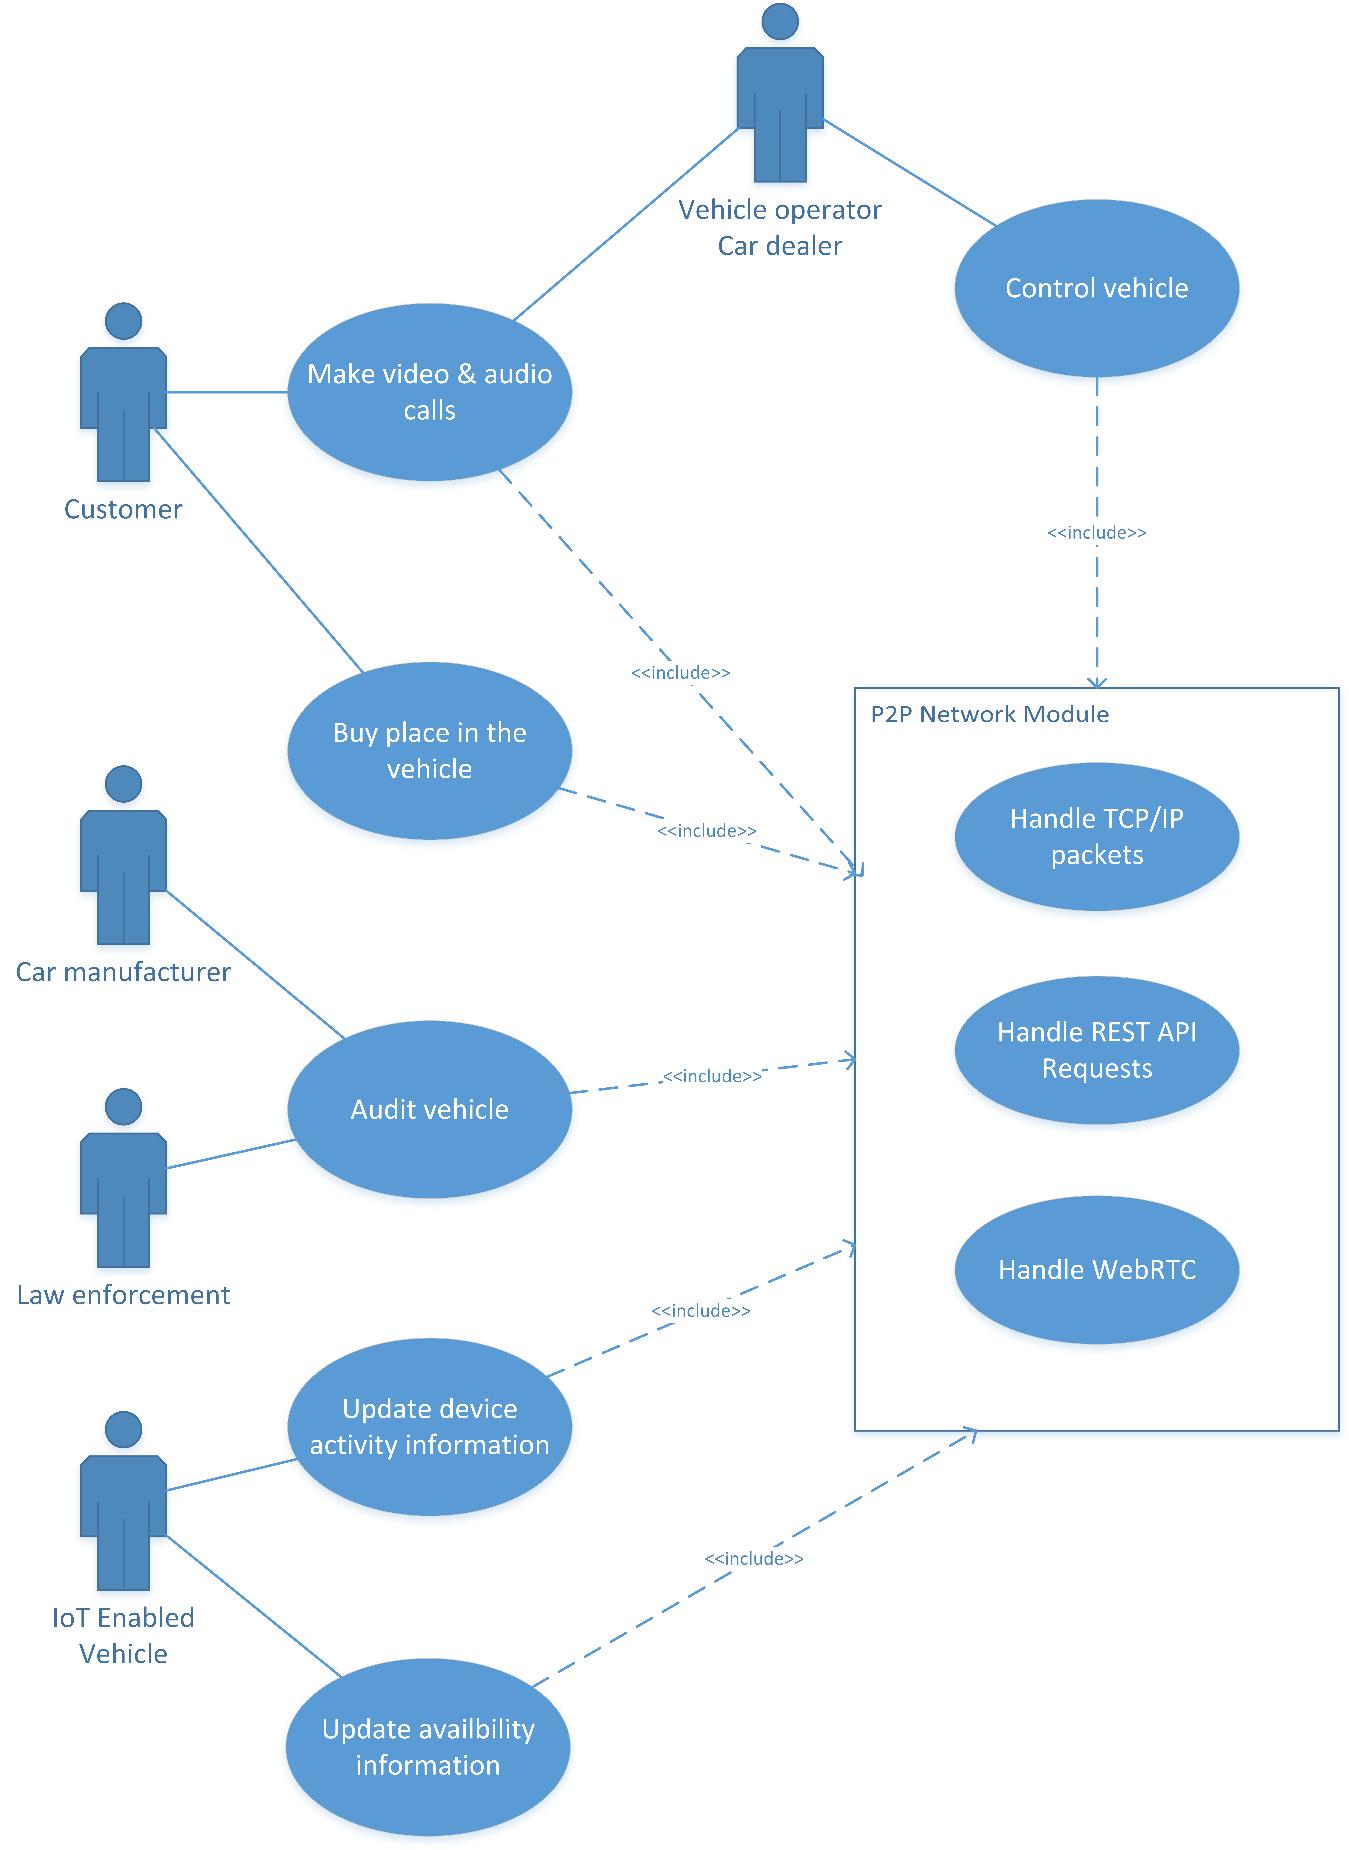
Real-time device & data management
By communicating peer-to-peer, several real-time data management issues are solved. Latency will be a relic of the past, and any DDoS attack will fail in slowing the network. Information will only be sent to the relevant parties with end-to-end encryption, bringing security to an acceptable level for autonomous vehicles. Crucial information, such as the location of a vehicle, recent accidents, or impending bad weather, will be made available immediately.
Publishing device and customer information
Businesses that are providing a service using autonomous vehicles will be able to make any necessary legal documents, such as safety certificates or insurance policies, available to clients and authorities by publishing them on the DHT. This would all be verifiable through timestamps, cryptographic signatures, and other metrics.
Identity management
Identity management will be handled by the DHT as well as self-executing smart contracts, and made secure and immutable by strong PPKI certificates. Identities of customers or owners of an autonomous vehicle being used for ride-sharing would be made available and verifiable by anyone by the Kademlia DHT and blockchain of Streembit.
Availability & booking management
Ride sharing will depend on a highly advanced and reliable availability and booking management system. The DHT and peer-to-peer communication will provide real time updates and ensure the integrity and security of the data throughout the entire process.
Legal contract management of autonomous vehicles
The Streembit blockchain, and the smart contracts made possible by it, would be leveraged to create a legal contract management system that covers jurisdictions worldwide. Anything from selling spaces in a self-driving car to selling insurance policies could be done with self-executing smart contracts that could be used it court to settle any disputes.
Audit device and human user activities
This solution offers a powerful and desirable auditing system. While it seems like a solution that provides this level of security and privacy would be the exact opposite, auditing device and human activity has never been better. Beyond auditing related to regulatory, legal, and insurance compliance. Car operators would be able to audit client and self-driving car activity and information while keeping privacy intact. Car operators can decide the scope of this system, and delegate certain tasks to the peer-to-peer network, while handling other tasks and accessing of information however they see fit.
1.8.2.Use cases
The following UML diagrams describes autonomous vehicle use cases managed by Streembit.
Use case No. 1 – Availability & booking management
Use case No. 2 – Authentication and access control
Use case No. 3 – Real-time data management and vehicle control
Use case No. 4 – Publishing device and customer information

Use case No. 5 – Identity management

2.Setup and configuration
2.1.Create account
Human users and Internet of Things devices are identified by their account name on the Streembit network.
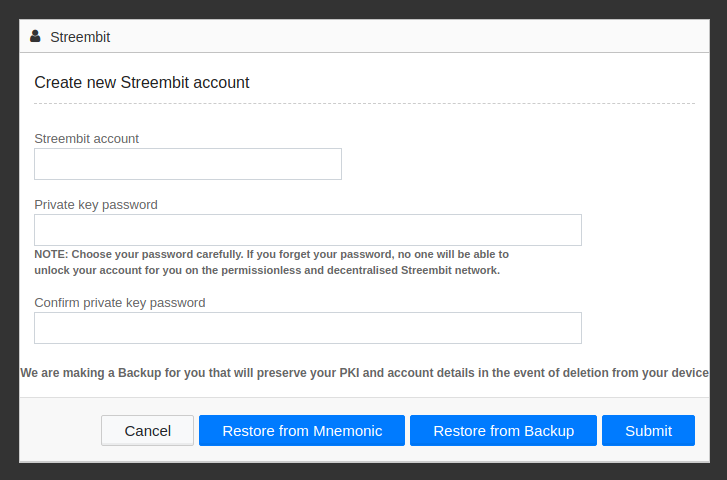
Click on the “New Account” button from the start screen.
Enter the account name. You will receive an error message if the account exists on the network. The account name must be between 6-20 characters and it can only contain alphanumeric characters (letters a-z, A-Z and numbers 0-9)
Enter the password key pair encryption password. Based on the password, the system generates a 256-bit AES key using PBKDF2 with a randomly generated 160-bit salt. The system protects the ECC public key pair with the 256-bit AES key. The password must be at least 8 characters, must not contain empty space, must contain at least one letter, one digit and one special character.
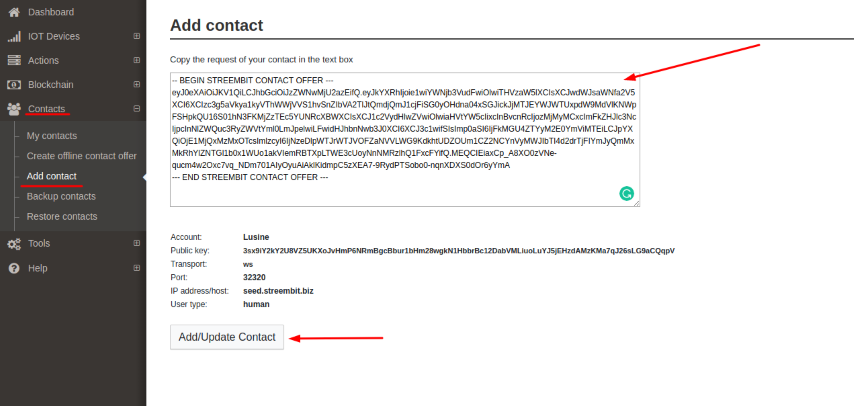
2.2.How to add contact?
Click on Contacts/Add contact in the menu bar, put the contact offer in the text box and click on the “Add/Update Contact” button.
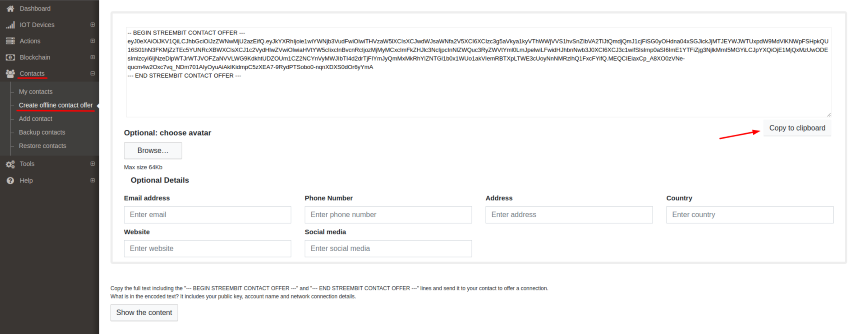
2.3.What is a contact offer?
Creating contact offer you encode your public key, connection details, account name. Then you can send this text to whom you want to communicate with. Click on “Contact/Create offline contact offer” in the menu bar. Clicking on “Copy clipboard” button you copy your contact offer and can use it.
2.4.My contacts
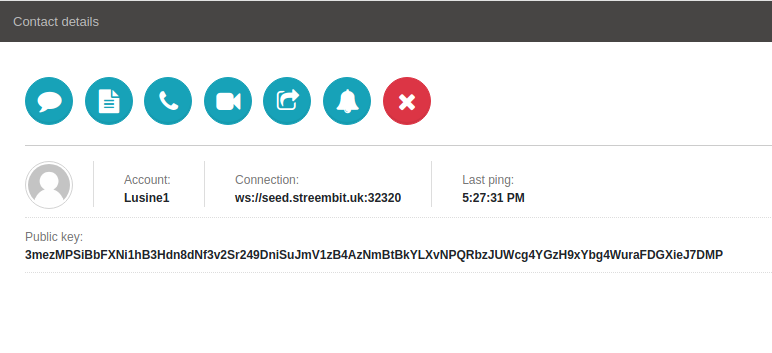
If you want to see your contacts you can click on Contacts/My contacts on the menu bar or you can click on the “Contact List” button in the top right side of the page.

Clicking on any contact in the contact bar will open the “Contact details” view, which will allow you to have a chat, video or audio call by clicking on corresponding button.
Be aware that Audio and Video call is currently not available on the IOS mobile browsers, except Safari v11 or Higher, due to Apple politics
Note: If you want to setup Streembit UI on the dedicated server and maintain Audio and Video call feature, SSL is mandatory.
2.5.IOT Devices
IOT devices are nonstandard computing devices that connect wirelessly to a network and have the ability to transmit data.
Streembit allows IoT application providers and context producers to register their IoT Objects on the decentralised Streembit network, and in turn allow context consumers to discover them in a secure and peer to peer manner.

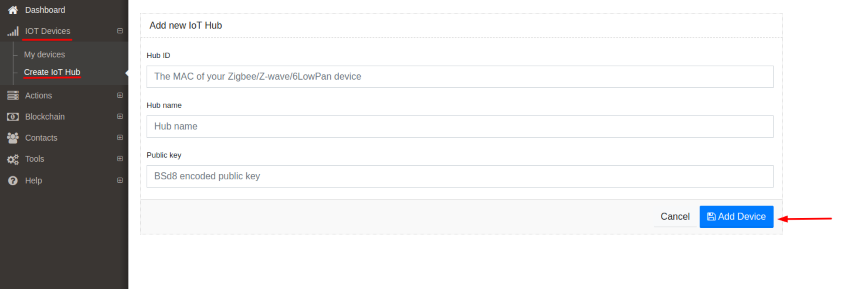
2.6.Add IOT Hub and My Devices
If you want to add the device click on IOT Devices/Create IoT Hub on the menu bar and fill in all required fields.
If you want to see your devices click on IOT Devices/My devices on the menu bar.
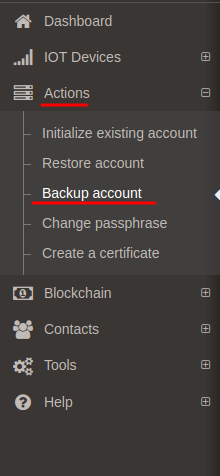
2.7.Backup account
You can perform an account backup to save a local copy of your Streembit account data. The Streembit account can be restored from a backup using the “Restore account” function.
In order to backup the account the account must be initialized. Click on the Actions/Backup account on the menu bar to start backup your account.
Your account backup data is never saved on a central server by the Streembit application and the account backup file is saved to your Download directory.
2.8.What is saved in the Backup file?
The backup file contains your encrypted Streembit ECC public/private key pair. The backup data is base64 encoded. It starts with “—BEGIN Streembit KEY—“, and the file ends with “—END Streembit KEY—“
2.9.Restore account from backup file
Why restore your account data? Your contacts identify your account and validate your identity using your PPK public key. The public/private key pair is created using a random entropy – once it is created then it cannot be changed. The public/private key pair isn’t deterministic and in order to communicate with your contacts, you must use the same public key which was published to the Streembit network and known to your contacts. The published public key can be restored from an account backup file.
You can restore your Streembit account data on any computer from a backup file.
Click on the Actions/Restore account on the menu bar or the Restore account to start restoring the account from a backup file.
2.10.Streembit settings
Click on the Tools/Settings menu item to open the Settings screen.
Network tab TCP port: Use this TCP port to communicate on the Streembit network. Port forwarding or the UPNP settings of your router must grant access to this port in order to send and receive data. If the transport is WebSocket (WS) then this settings is not used by the application. WebSocket port: If the TCP port is not available then the connect to the WebSocket listener must listen on this port. Transport: Transport protocol. The default is TCP. Select the WebSocket transport if the incoming TCP traffic is blocked by your router or firewall. If the WebSocket transport then make sure the WebSocket listener seed node is operational.Use WebSocket fallback: Many firewalls and home network routers block incoming TCP communication and this is a fallback solution for users who are unable to use the TCP protocol. By enabling this configuration option the system will try to communicate on the WebSocket protocol when the generic TCP communication is blocked. Please note, WebSocket listeners run by community peers and the availability of WebSocket listeners is limited on the network. Try to run your own seed to support the network and Streembit community, and ensure the WebSocket listeners is available! Also, make sure the WebSocket listener is enabled in the seed nodes if you run a private Streembit network!
Seeds tab List of seed nodes: The seed nodes assist in user and device discovery, and stores the users’ public key data in their distributed hash table (DHT) storage. Also, you can define here your seed nodes if you run a private Streembit network.
Ice resolvers tab Complete decentralization is not possible in Internet communication. All decentralized systems like Bitcoin or Telehash must use some internet services for certain tasks. For instance, decentralized systems use DNS servers and services to resolve domain names. WebRTC video and audio chats clients use ICE servers to get information about their own IP address.
Private network tab Seed account, Seed port, Seed IP/domain name: If the Seed account, Seed port and IP/domain name are defined then the software operates in private network mode. Please note, the seed node must be configured to run as a private network node as well. Remove these configuration settings if you want to connect to the public Streembit network.
System tab Log level: Defines the log level. Debug: most detailed logging. Info: only important system events logged. Error: only application errors logged. Developer mode:Software developers should select this option to resolve directories and develop the software from IDE such as Visual Studio.
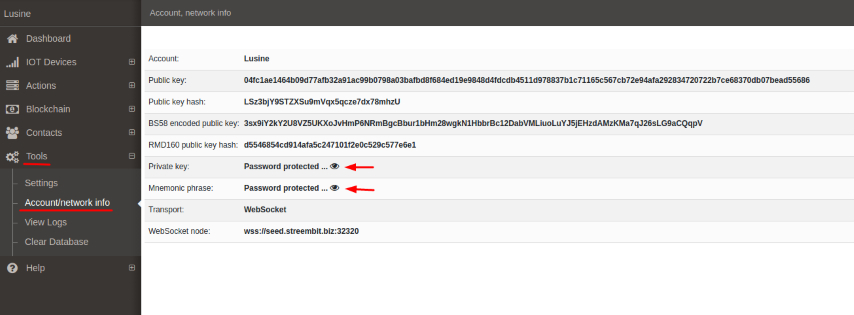
2.11.Account/Network info
If you want to see your account/network information click on the “Tools” in the menu bar and click “Account/Network info.
When you in the “Account/Network info” view you can see that the Private key and Mnemonic phrase are private. It means you should enter your password and after it, you can see your private key and mnemonic phrase. For it click on the “eye” icon next to these fields and enter your password.
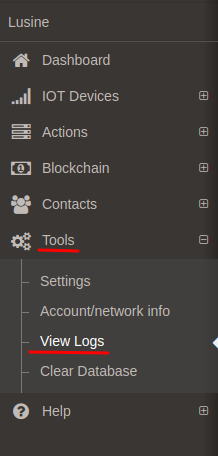
2.12.Log files
Your Streembit system provides vital information using an application log file. The log file is JSON file format and sits in the application /log directory. You can also open the log file by clicking on the “Tools/View Logs” in the menu bar. Configure the log to “Debug” log level to populate detailed debug messages from the application.
2.13.Clear database
It is essential to clear the database if you are using Streembit on a public computer, for example in an internet café or airport.
You can remove all Streembit data from the computer by clicking on the “Tools/Clear database” in the menu bar. Once the deletion is confirmed all settings and data will be removed from the local database. Make sure you made a backup if you want to keep using your account.
![]()
3.Streembit Network
3.1.System architecture
The Streembit system forms a decentralized peer to peer network to manage connections between machines and machines or humans and machines. The participants in the network are the peer nodes. The peer to peer network is scalable and an unlimited number of nodes can participate in the network.
The system performs public private key infrastructure based authentication and access control functions to securely connect peer nodes. The application generates at least one private/public key pair on each peer node including on the Internet-of-Things devices. The actors of the system publish their public keys to the peer to peer network via a Kademlia distributed hash table (DHT). Each peer node knows the public key of the other connected peer nodes. The system identifies peer nodes in the peer to peer network by their public key. To ensure data integrity the nodes sign the messages with their private key. The nodes sign all messages – there are no unsigned messages circulated in the system. (The requirement for signing the messages also help to mitigate the risks of Sybil attacks and DDoS attacks).
Streembit supports two types of network implementations:
- Public network. Anyone can connect, there is no security gate enabled in the public network. The main Streembit network is public.
- Private network, which implements a security gate to provide only a set of preconfigured contacts with access. A private Streembit network is isolated from the public Streembit network. Only certain peer nodes are allowed to connect to the network. The access control is governed by built in authentication functions. Typically, IoT devices within a building, teams, communities or businesses would run a private Streembit network to establish an even more secure communication mechanism than the public Streembit network. A private Streembit network is functioning as a firewall: only preconfigured contacts allowed to connect. The collection of the preconfigured contacts is maintained in a lookup list. The connection of devices and users which are not in the preconfigured list is refused by the private network.
3.2.Internet of Things devices
Streembit is a unified communication platform for both human users and Internet of Things devices.
Streembit manages device discovery as well as authentication, access control and provisioning of devices without using a centralized authority server. The system facilitates device discovery and device control in a peer to peer manner. For many IoT use cases a decentralized, P2P network topology is the most secure, robust, scalable and reliable method of operation. Instead of using expensive corporate owned third party cloud systems, Streembit manages Internet of Things devices without the need of proprietary centralized cloud platforms. Centralized, corporate owned cloud is certainly an easier way to build out IoT platforms. However, the owners and authorities in these topologies all have an influence upon the network and can be exploited. They can ban devices, spy on devices and compromise data integrity of devices. In fact, government can order them to do any or all of these. In the near future, the doors of your garage and home, air conditioning units and your home security system will be fully internet connected. You will be able to control your home automation system from your mobile phone. It is essential that only you can control your IoT devices. Streembit excludes third party service and cloud providers from the ecosystem to give full control to the end users over the devices.
The primary premise of this system is that all aspects of the IoT device operation must consist of decentralized P2P communication between the device and human user. For example, in the case of a building’s door device: a secure and decentralized P2P system can manage the door (including device configuration, upgrades and provisioning). There is no need to involve a centralized server nor a cloud based solution in order to implement a secure and fully operation Internet of Things system.
Internet of Things device discovery on Streembit Streembit allows IoT application providers and context producers to register their IoT Objects on the decentralised Streembit network, and in turn allow context consumers to discover them in a secure and peer to peer manner.
Control Internet of Things devices via Streembit
- The Internet of Things devices and human users communicate with each other directly in a peer to peer manner
- The data is end to end encrypted between the human user and IoT device. The encryption key is shared only between the user and device – never with any third parties.
- The device exposes functionalities via the Streembit network and user interface using W3C WoT standards
- The user interacts with the device via the Streembit P2P layer and UI. For example, opening a door, turning ON a light, controlling motor speed, getting temperature data, viewing CCTV pictures etc. all peer to peer, without a centralised solution and via the Streembit user interface.
Upgrade and manage Internet of Things devices via Streembit
- Hardware and software providers upgrade Internet of Things devices on the always up and running Streembit network.
- Internet of Things device manufacturers and software designers publishes firmware and software updates via the Streembit network.
- Internet of Things devices run the Streembit system and ensure the origin and data integrity of the updates by verifying the public key of the publisher.

Standards The Streembit Internet of Things system is based on the latest W3C Web of Things standards. The system incorporates the latest modules from the W3C web-of-things-framework. The devices are defined with JSON-LD and the security uses FIPS standards for cryptography and JWT, JWS and JWE standards to secure data.
To integrate devices with Streembit please refer to the IoT section of the Streembit Github repository.
4.Security and Encryption
4.1.Streembit security implementation and design summary
The cornerstone of Streembit security is elliptic curve public/private key cryptography infrastructure (PPKI). PPKI allows the implementation of robust security. We use PPKI to identify the entities of the system (based on their public key and PPKI signature), perform authentication, and ensure data integrity (using cryptography signatures). Using the public/private key cryptography infrastructure paves the way for the deployment of a robust, secure authentication and access control scheme. The parties are identified by their public key. The authenticity of messages and the identities of the actors are then verified using PPKI cryptography routines. Using a PPKI infrastructure based security scheme greatly simplifies the authentication, access control, and identity management aspects of Internet-of-Things security.
The basic premises of the Streembit security are…
- Human users and Internet of Things devices use public/private key (PPK) infrastructure and PPK cryptography functions to secure messages
- Each actor of the system must generate a public/private key pair. (Typically keys are generated prior to configuring the device and will be burned into the devices’ firmware).
- The device or user publishes the public key to other users of the system.
- The data integrity and authenticity of the messages is guaranteed with PPK signatures.
- Each session between users is secured with strong symmetric cryptography keys.
- All messages between users are secured with 128-bit and 256-bit AES symmetric encryption/decryption.
- The system uses elliptic curve Diffie Hellman (ECDH) key exchange algorithms to facilitate the exchange of session keys.
4.2.Protecting the ECC public/private key pair
The ultimate issue of all applications, systems, and devices that protect data with cryptography is the security of the symmetric key of the encryption or the private key of the public/private key pair. Similarly to the iPhone and PGP, which both use passcode to protect their keys, Streembit requires users have a passcode to protect their PPKI private key. The Streembit passcode that protects the user’s PPK key pair is relatively complex.
To protect real time communication, Streembit uses a randomly generated 256-bit AES session key and exchanged between peers with a randomly generated ECDH key pair. This means that real time communication, which is the main functionality of Streembit, is secure even from the brute force attacks of NSA super computers and large zombie computer clusters of cyber criminals.
4.3.Mitigate the risk of Sybil attacks
A known issue with regards to peer-to-peer (P2P) networks and their practical limitation is that they are frequently subject to Sybil attacks. This means that malicious parties can compromise the network by generating and controlling large numbers of shadow identities. A malicious node may present multiple fake identities to a peer-to-peer network in order to appear and function as several distinct nodes.
A Sybil attack is most effective on anonymous and reputation systems where if the malicious nodes outnumber the honest nodes the outcome of the application could be compromised. For example, on a file sharing network a successful horizontal Sybil attack allows the attacker to sniff most of the control messages, hijack the system, and deliver bogus content. Contrarily, Streembit facilitates communication between contacts that you know, such as your family members, teammates, and business partners. You are also aware of the location and identity of your Internet of Things device(s) you control via Streembit, lessening the likelihood of a Sybil attack. Malicious nodes, regardless of their weight and presence on the network, are unable to change the public keys of your contacts (as the public key is based on the cryptographically secured PPK infrastructure).
Additionally, Streembit introduces another layer of security, private networks. Using private networks, the public keys of the contacts are loaded to the seed nodes manually; mitigating further the risk of a Sybil attack as well as a Man-in-the-middle attack (MITM). A Sybil attack, which generally speaking is a serious security issue for P2P networks such as file sharing applications, is much less of a problem for the Streembit P2P system.
4.4.How secure the cryptography of Streembit?
Both 128-bit and 256-bit AES symmetric encryption, the cryptography schemes of the messages in the Streembit network, are safe from any brute force attacks. The following UML diagram describes the key exchange using ECDH and securing the message with 256-bit AES symmetric key between ‘User A’ and ‘User B’.
5.Linux Machine Preparation
5.1.Preface
Through the examples on this document the steps are being executed using an alternative user than root, this is, a regular user that can escalate root privileges using the sudo tool, the user will have the ability to execute commands using sudo or also impersonate as root to execute the command, one way or the another are valid options, what will be disabled is the root user ability to connect remotely which is not a best practice but not disabling the root user on the local system it’s only limited how it authenticates to the server.
To clarify, the options are, execute commands like ( sudo command ) or impersonate as root like ( sudo su – ) and then execute the commands as root itself. The commands that the regular user can execute as root can also be limited for example if there is the need to have multiple administrator users that can perform different tasks, those tasks or commands can be configured and limited, for example, a user can only add users to the system but not delete them, on the other hand you can have another user that can delete, add and modify a user or have another user have rights to upgrade system packages and reboot the server to apply the changes if needed.
Worth to mention that it’s also possible to define a list of commands and then associate a user to a group that can execute those commands, the idea behind this is to delegate administrative tasks if needed, instead of granting root access by default to a particular user, in large organizations where there are system operators, developers, administrators and so on this can be really handy, where not all the users are allowed to do the same.
5.2.Setting Up Administrator User
Before disabling remote root login let’s create an administration user with root privileges so this will be done as root.
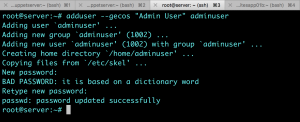
- Configure sudo
![]()
- Test The Configuration
Impersonate as adminuser

As adminuser impersonate as root, now you are ready to connect remotely using adminuser and escalate root privileges.

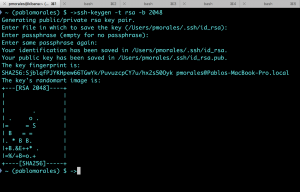
5.3.SSH Key Generation and Distribution
Generate the keys on you local terminal
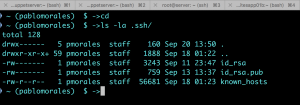
Distribute the Key
Keys are store under .ssh/ directory , type cd and press enter then list the directory content.
Type cd and press enter to place yourself on your root home directory, then copy the keys.
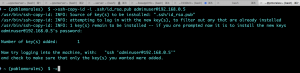
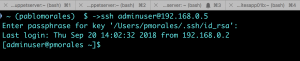
Connect as adminuser
![]()
Protecting The Private Key
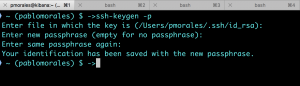
Now while connecting again to the remote host you will be prompted for the passphrase you entered in the step above.
5.4.Getting Operating System Updates
Fetch the updates.
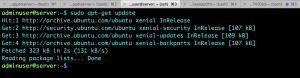
Upgrade any package if needed, type y and press enter to accept and install.

5.5.Network
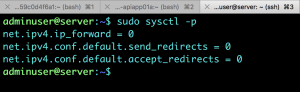
sudo sh -c ‘echo “net.ipv4.ip_forward = 0” >> /etc/sysctl.conf’
![]()
sudo sh -c ‘echo “net.ipv4.conf.default.send_redirects = 0” >> /etc/sysctl.conf’
![]()
sudo sh -c ‘echo “net.ipv4.conf.default.accept_redirects = 0” >> /etc/sysctl.conf’
![]()
Apply the changes.
- Check Open Ports
Check for open ports, useful to configure the firewall.

5.6.Setting Up Firewall
Install the package.

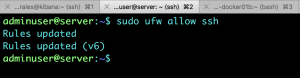
Allow ssh service.
Enable the service
![]()
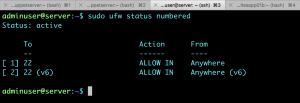
Check the rules.
5.7.Setting Up Apparmor
Apparmor Profile Modes.
- Complain / Learning: Good for debugging and testing
- Enforcing: Profile is enforced and service protected
In complain mode the profile is enabled and errors are logged but not blocked , this is good for troubleshooting or testing when configuring a new service, for example apache or nginx when you are checking the service accesses only the directories it should.
When done troubleshooting or testing you can apply the enforce mode and prevent the service do things it should not, in the case of apache or nginx, if the service tries to access a file outside the document root directory configuration it will be blocked.
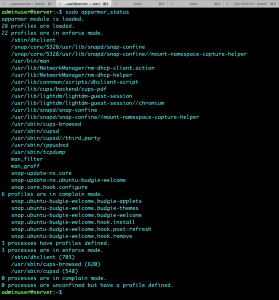
On Ubuntu Apparmor is installed by default just check the status as follows, this output may vary and the profiles listed below may not be the same.
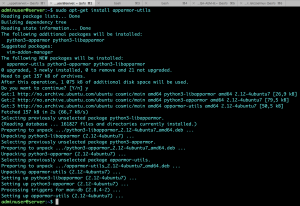
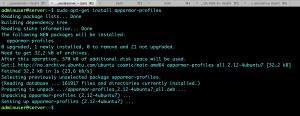
Utilities are not installed by default so install them
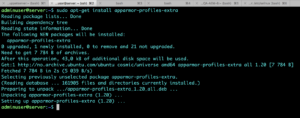
Install extra profiles to extend it’s functionality to monitor and secure other services.
cd to the samples directory
![]()
If you are installing on Ubuntu 16 LTS the path is the following
![]()
Copy the sshd service profile to apparmor configuration directory.
![]()
On Ubuntu 16 LTS
![]()
Set the the profile in enforce mode to protect the service.
![]()
Check if the rule is loaded
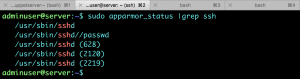
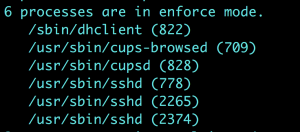
Check the status again and at the end you will see the process is in enforcing mode, at the end of the listing you will see something like this.
![]()
Do not close your current ssh session, open up a new terminal and ssh to the server, if you can login you are good in case you you get a connection refused or cannot login set the service to complain mode as shown below and try to login again.

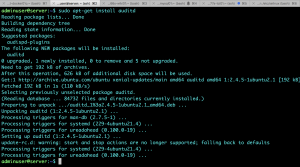
5.8.Setting Up Auditd
Check if it’s installed, if there is not output there is not.
![]()
Install the package
Enable the service so it starts automatically on boot up.
![]()
Switch to root to complete the configuration process.
![]()
cd to the configuration directory
![]()
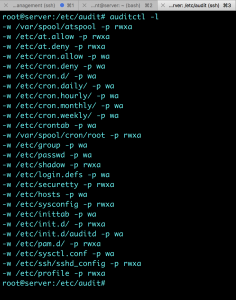
Edit the configuration file.
![]()
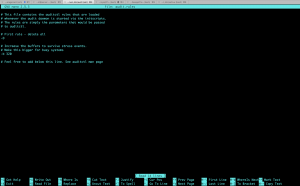
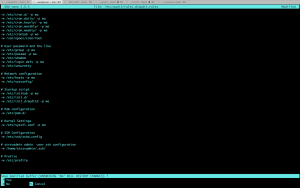
Append the following content, this can be extended or modified.
# cron stuff
-w /var/spool/atspool
-w /etc/at.allow
-w /etc/at.deny
-w /etc/cron.allow -p wa
-w /etc/cron.deny -p wa
-w /etc/cron.d/ -p wa
-w /etc/cron.daily/ -p wa
-w /etc/cron.hourly/ -p wa
-w /etc/cron.monthly/ -p wa
-w /etc/cron.weekly/ -p wa
-w /etc/crontab -p wa
-w /var/spool/cron/root
# User password and the like
-w /etc/group -p wa
-w /etc/passwd -p wa
-w /etc/shadow
-w /etc/login.defs -p wa
-w /etc/securetty
# Network configuration
-w /etc/hosts -p wa
-w /etc/sysconfig/
# Startup script
-w /etc/inittab -p wa
-w /etc/init.d/
-w /etc/init.d/auditd -p wa
# Pam configuration
-w /etc/pam.d/
# Kernel Settings
-w /etc/sysctl.conf -p wa
# SSH Configuration
-w /etc/ssh/sshd_config
# Profile
-w /etc/profile
Save the file just type Ctrl + x then y to confirm
Press enter to confirm and exit
![]()
Restart the service.
![]()
Check it’s status
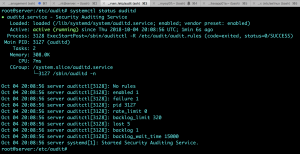
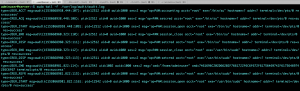
Check the running rules.
Also you can check the log file activity, press Ctrl + C to get back to command line prompt.
5.9.Setting Up SSHD
Go to the configuration directory.

Make a backup![]()
Edit the configuration file.
![]()
Change PermitRootLogin from prohibit-password to no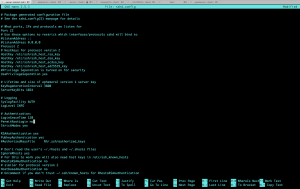
Press Ctrl + x then type y
![]()
You will be asked for a filename, just press enter to save and exit.
![]()
Check if there is a syntax error, is there is no output it’s fine to restart it.
![]()
Restart the service.
![]()
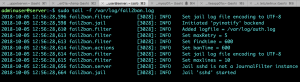
5.10.Setting Up Fail2ban
Install the package.
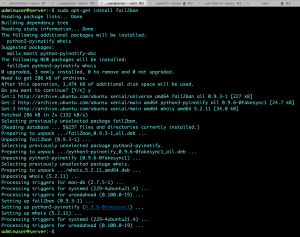
Go to configuration directory and create a custom configuration file name jail.local
![]()
![]()
Enable and start the service
![]()
Start the the service and check the status
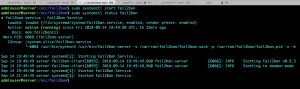
Check the logfile, press Ctrl + C to get back to command line prompt.
5.11.Setting Up Sudo
NOTE: This must be done as root.
Add admin privileges to adminuser via sudo
![]()
![]()
- Test sudo
As adminuser impersonate as root
![]()
6.Streembit CLI
6.1.Introduction
Streembit back-end application
This application is the Streembit back-end process. Depending on the configuration settings the application can run as * A Streembit Kademlia node * A Streembit client application * A Streembit IoT application * A Streembit blockchain application
6.2.Dependencies
Get the dependencies with
$ npm installInstallation notes:
Before installation make sure you have nodejs v12 or higher
npm v6 or higher (latest stable)
Node-gyp
for Unix:
Python v2.7, v3.5, v3.6, v3.7 or v3.8

C/C++ compiler (like GCC)
for macOS:
Python v2.7, v3.5, v3.6, v3.7 or v3.8

Xcode Command Line Tools
Windows:
Python v2.7 or higher
shell npm install leveldown --msvs_version=2015
Windows installation note: If you face an issue during the installation of node-gyp, Open Powershell as admin and runnpm install -g windows-build-tools
In order to run the application a configuration file config.json must exists in the root directory of the project.
A typical configuration file is the following:
{
  "database_name": "streembitsql",
  "cmdinput": false,
  "seeds": [],
  "transport": {
    "protocol": "http",
    "host": "182.120.242.165",
    "port": 32321,
    "ws": {
      "port": 32318,
      "maxconn":  10000
    }
  },
  "limits": {
    "refresh": 3600,
    "replicate": 3600,
    "republish": 86400,
    "expire": 86405,
    "timeout": 5
  },
  "modules": [
    {
      "name": "seed",
      "run": true
    },
    {
      "name": "client",
      "run": false,
      "account": "",
      "contacts": []
    },
    {
      "name": "blockchain",
      "run": false
    },
    {
      "name": "iot",
      "run": false,
      "serialport": "/dev/ttyS0",
      "protocols": [
        {
          "name": "zigbee",
          "chipset": "xbee"
        },
        {
          "name": "zwave"
        },
        {
          "name": "6lowpan"
        }
      ],
      "devices": [
        {
          "type": 1,
          "protocol": "zigbee",
          "mcu": "xbee",
          "id": "0013a20041679c00",
          "name": "Streembit Hub",
          "permission": 1,
          "details": {
            "manufacturername": "ZoVolt",
            "modelidentifier": "ZOVOLT-P2PIOTHUB-01",
            "hwversion": "0001",
            "protocol": "Zigbee",
            "security": "ECC PPKI",
            "NFC": true,
            "endpoint": 2
          }
        }
      ]
    },
{
      "name": "dns",
      "run": true,
      "host": "srv.streembit.net",
      "port": 8080
    }
  ],
  "log": {
    "level": "debug",
    "logs_dir": "logs"
  }
}
in case you have issue with starting the app with error: failed to require leveldown
Delete package-lock.json and install Streembit-db from repo:
npm i git+https://github.com/streembit/streembit-db.git
6.3.Fields
account: This is the account name stored in the local SQLITE database. The Streembit UI identifies this node by this account name
password: To decrypt account information in the SQLITE database. For development purpose and make easy to develop the software define this password in the config file. In production, provide this password from the command line using the –pasword (or -s) command line switch. See “node streembit.js –help” for more command line arguments.
The database_name field: This is the SQLITE database name. Default value is “streembitsql“. You may change it for production or for testing purpose. For using different databases in production or testing.
When the cmdinput field is true the application can recieve commands via the terminal. Also, when the “cmdinput” field is true the terminal logs are disabled and only file based log is enabled.
The transport field:
protocol: default value is “http“.
host: IP address or domain name for the HTTP listener. For seed node: Since The Kademlia contact is the composite of IP address and port, if the application run as a Kademlia seed node this field is required and must be an IP address.
port: Port for the http listener. Default value is 32321
ws.port: Port for the websocket listener. Default value is 32318.
seeds: Array of Streembit Kademlia seed nodes.
The format is
The host and port where the seed node listen for connections.
The limits section of the configuration determines time interval values of various KAD operations.
“Limits” intervals (values are in seconds):
refresh: Interval for performing router refresh, Default value is 3600
replicate: Interval for replicating local data, Default value is 3600
republish: Interval for republishing data, Default value is 86400
expire: Interval for expiring local data entries, Default value is 86405
timeout: Time to wait for RPC response, Default value is 5
modules: This section defines how the application will be executed. Whether it is seed, client, IoT node or a blockchain node. The “run” flag of each module defines whether or not execute the module. Both “seed” and “client” cannot be defined, it must be either “seed” or “client”.
The role of the DNS module is to manage dynamic DNS updates for the domain name based host field. The DNS module defines the parameters of a dynamic DNS service. This module is used in case if you define a domain name at the transport.host field and network router uses DHCP. Using DHCP the DNS A record of the doomain name (host) must be updated upon the start of this CLI application. By default the application uses srv.streembit.net:8080. Most CLI will define a static IP address at the host field. In case if an IP address is defined at the transport.host field then you must remove the DNS module from the configuration file.
log: logger settings.
[
    {
        "host": "192.168.0.10",
        "port": 32322
    }
]6.4.Kademlia network
Create a Kademlia network for test and development
When do you need to execute this step and experiment with the Kademlia network? * If you want to understand better how the Streembit Kademlia network works * If you want to develop the UI and connect to a local Kademlia network
Do you need this for Streembit IoT module and to run the Streembit IoT module on a Raspberry PI? No. If you want to run the Streembit IoT handler please skip this section and move to the “Streembit IOT Handler” section.
For test and development purposes to create a basic Kademlia network at least two nodes must exist on the network. To run multiple nodes on a computer, do the the following steps:
1) In step 1 we need to create a streembit-cli application, this will be seed No. 1, the first seed node of the Kademlia network. The “port” of the config.json file can be default port 32321. The “host” field of the config.json file must be defined. For development purposes it should be your local IP like 192.168.xxx.xxx or even just 127.0.0.1. The “account” field can be anything, such as “seed1”. The “seeds” field of the config is an empty array.
Run the application, with
In a case you start a pm2 instance of the app you should also provide a valid password
node streembit --pwd PASSWORD
// OR
node streembit --pwd=PASSWORD
The console and the log files should display a warning log “there are no seeds defined, the node is not connected to any seeds” which indicates there are no seeds defined.
2) In step 2, clone streembit-cli to an other directory (or copy the existing one). This will be the second seed of the Kademlia network. Set the port to 32322. Since this is a TCP listening port it must be different than the port of seed 1 node.
Define the seeds array in the config file. The seed is the instance that is described at point No. 1. The seed config settings:
{
 "seeds": [
  {
      "host": "192.168.0.10",
      "port": 32321
  }
 ]
}
(The host is your machine’s local IP so it might different than 192.168.0.10.) Set the “account” field, it can be anything, but should be different than seed No. 1, like “seed2”.
Run the application with
node streembitAt this point seed No. 2 will try to connect to seed No. 1. Upon successful connection you should see debug messages on the console as well as in the log files of seed No. 1. These are debug messages related to FIND_NODE Kademlia operations. “debug: received FIND_NODE from {‘publickey’: ‘…’ }” The public key of the message is the public key of seed No. 2 that is logged to the console and log file during startup. The FIND_NODE messages indicates that the Kademlia network is formed.
Once the Kademlia network is operational the Streembit UI application can connect to the network.
Note:
In order to run Kademlia network on your local machine you should add a “kad” setting to your config file, example:
 "kad":
  {
      "host": "182.120.242.165",
      "port": 32321
  }
To run the CLI as an IOT node please refer to the Software preparation found in the IOT SDK page”
6.5.Commands
Set the “cmdinput” field to true in the config.json configuration file to intiate the command line handler. The command line handler accepts commands from the terminal. In “cmdinput” mode once the application is initialized there is a command prompt displayed: “Enter command type:”
Add user
Enter the “usr” command type at the command prompt.
usr
The “Enter users command:” prompt will appear. Enter “add” to the command prompt.
addAnswer the prompt by typing the user name, public key, whether or not the user is an admin (1 or 0 value). The public key is the long PKI public key format that you can get from the Public key column of the “Account/network info” view, accessbile from the “Tools” menu at the Streembit UI application.
7.Streembit IoT SDK
7.1.Introduction
The Streembit IOT gateway developer kit allows qualified users to set up a Peer 2 Peer communication network that is secure and can control Home Automation Zigbee standard devices. This solution brings a high level of security which exists already within the Streembit communication network platform.
This documentation has been created to provide a guide to the ‘Developer’ user who has experience with programming and is familiar with the Raspberry Pi Eco system. However it is not beyond the scope of the casual user if they take extra time to follow the instructions and pay close attention to the detail and syntax of the documentation.
There are a number of specific configuration requirements and also instructions which should be followed to ensure the developer kit is operational following the set-up
There are resources available in this guide to assist with the set-up which shall be listed here, along with the required hardware components.
7.2.Required Hardware
- Raspberry – Pi model 3B
- SD card for Raspberry Pi
- Zovolt Gateway – Streembit R-Pi hat / Expansion board
- Ethernet cable – recommended to connect R-Pi to router
- A working Internet connection
Optional items used to prepare unconfigured Zovolt Gateway Board are listed below
- FTDI – module to program Zigbee chip on Zovolt Board
- Jumper wires connectors (man-female) for connecting FTDI module to Zovolt board
- Mini-B – USB cable for connecting FTDI module to configuration Laptop
7.3.Understanding the fundamentals of the Streembit platform
Before we start it is beneficial to familiarize yourself with the architecture and terminology of components both hardware and software to set up a working Streembit Network
The Streembit P2P (peer-2-peer) Platform is made up a nodes, which can take on different roles depending on the ‘use’ case – It is therefore important to ensure you follow the correct areas of the Readme documentation and config file examples in this repository for creating an Streembit IOT private network.
The Streembit UI (User Interface) Can be run as an application or a web server. Zovolt Ltd has made this available for IOT developers at streembit.co where you can create an account and complete the setup process, once the Streembit CLI – Command Line Interface node is set up on the Raspberry Pi.
The Streembit CLI (Command Line Interface) This element of the Streembit network can be set up as a node to perform different roles within the Streembit network
The principle roles are
- Seed node for Streembit P2P networking – Kademlia network
- Client node
- Blockchain node for operating as a contributing asset to the Streembit Blockchain performing validation of transactions
- IOT handler node – to allow command and control of remote devices of a private Streembit IOT network
For this tutorial the Streembit IOT handler is our focus, so it is important to ensure that you read the correct sections and config file examples that are relevant to the CLI working in this role.
Once you have assembled the acquired hardware and are ready to set up the Streembit software with an internet connection, you as the developer can start the process of preparing the environment and also setting up the Zovolt (Xbee hat / expansion board) ready to work with the Streembit CLI application and connect Zigbee devices.
The following steps should allow the user to efficiently set up Streembit IOT
In the initial step please create an user account at streembit.co if you do not have one. This is the user interface that you can use to quickly set up our IOT network.
7.4.Hardware preparation
7.5.Zovolt gateway preparation
This is an optional step – preparing the Zovolt Gateway before connecting to the Raspberry Pi
In some instances of development and where the Zovolt Board hasn’t been pre-configured you will need to set the board up following these steps.
7.6.Write settings to the XBEE module
Install the DIGI XCTU configuration tool. This application must be used to configure the XBEE Zigbee MCU. Using the DIG XCTU software the following settings within the XBee ZB SMT module would need to be set: * ZS: 2 * AP: 1 * AO: 3 * EE: 1 * EO: 2 * KY: 5A6967426565416C6C69616E63653039 Reference: http://knowledge.digi.com/articles/Knowledge_Base_Article/Zigbee-Home-Automation
7.7.XBEE MCU configuration - Connecting the FTDI serial converter to the Zovolt Zigbee Gateway
The XBEE module of the Zovolt IoT Zigbee Gateway can be programmed with an FTDI USB-to-Serial breakout board. The FTDI board can also connect the Zovolt Zigbee Gateway to the nodejs streembit-cli instance via serial line using the PC/laptop USB connector when the CLI runs on a PC/laptop. The pin connection between the FTDI board and the Zovolt Zigbee Gateway:
| FTDI | Gateway-JP1 |
|---|---|
| DTR (yellow) | Pin 1 |
| RXI (blue) | Pin 4 |
| TXO (green) | Pin 3 |
| 3V3 (red) | Pin 6 |
| CTS (geeen) | Pin 2 |
| GND (black) | Pin 5 |
The pictures display the FTDI and gateway wires.
Jumper wires connecting the FTDI module
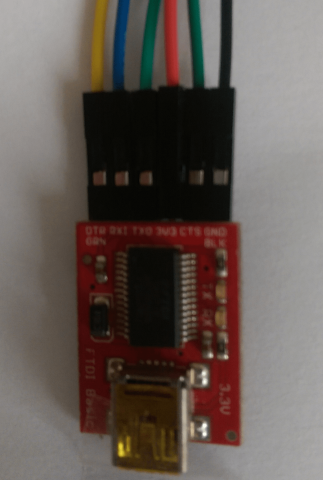
Jumper wires connecting to the Zovolt Gateway Board
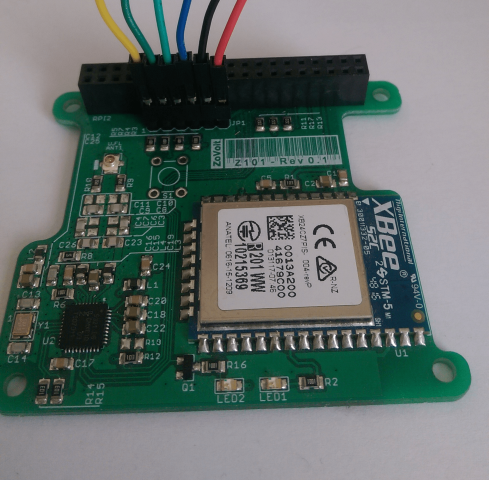
7.8.Raspberry Pi - Preparation
Here you will find the instructions and some additional links to setup the Raspberry Pi ready to install and run the Streembit CLI application. You may prefer to attach separate screen and keyboard to the R-Pi instead of using SSH to connect to it.
7.9.Install the Raspberry PI
Burn the latest Raspbian OS to a micro SD card.
https://www.raspberrypi.org/documentation/installation/installing-images/
Add an ssh file to the Raspbian boot image at the SD card. Step 3 in this tutorial:https://hackernoon.com/raspberry-pi-headless-install-462ccabd75d0
7.10.Login via SSH and configure the device
sudo raspi-config
Login to the Raspberry PI via SSH using your Linux/MAC SSH client or PUTTY on Windows. If you don’t have access to the router to lookup the IP address, use the Advanced IP Scanner application to find your Raspberry PI device www.advanced-ip-scanner.com. The default user name: pi, password: raspberry.
Once you logged in via SSH: 1. Enable SSH: select Interfacing Options. Navigate to and select SSH, and select “Yes”. 2. Enable serial port: select “Interfacing Options”. Navigate to “Advanced” and select “Options/Serial”. You will be prompted with the “Would you like a login shell to be accessible over serial?” question. Select “No”. Then you will be prompted “Would you like the serial port hardware to be enabled?”. Select “Yes”. Select “Finish” and reboot the device. 3. Refer to the “For latest Jessie version” section at https://hallard.me/enable-serial-port-on-raspberry-pi/
ls -l /dev
Check the available serial ports and serial port aliases. ttyS0 should be listed in dev directory
7.11.Install the latest Nodejs
Option 1
Install Nodejs with APT package manager
# Install with package manager
curl -sL https://deb.nodesource.com/setup_9.x | sudo -E bash -
sudo apt-get install -y nodejs
Option 2
Install Nodejs with NVM (Node Version Manager)
# Install with NVM
wget -qO- https://raw.githubusercontent.com/creationix/nvm/v0.33.0/install.sh | bash
# Now close you terminal and then open it up again
# to make nvm command available
nvm install --lts
Option 3
Install Node.js from source
The version should be at minimum 9.10.0
# Install from sources
sudo apt-get update
sudo apt-get install build-essential checkinstall
cd /usr/local/src

# Download the latest Node.js source.
# Substitute 9.10.0 with the latest Node.js version number

sudo tar -xvzf node-v9.10.0.tar.gz
cd node-v9.10.0
sudo ./configure
sudo make install

# when the system completes the downloading and installation procedures,
# make sure you have nodejs installed

node -v

# Update npm to the latest version
sudo npm install -g npm7.12.Install PM2 process manager
# Install pm2 globally
sudo npm install -g pm27.13.Install git and clone CLI repository
sudo apt-get install git

# cd to arbitrary folder on which you have r/w permissions
cd /FOLDER/OF/DEPLOY
git clone https://github.com/streembit/streembit-cli
cd streembit-cli
Windows installation note: If you face an issue during the installation of node-gyp, Open Powershell as admin and runnpm install -g windows-build-tools
7.14.Connect to a WiFi network
Set the SSID and WPA-PSK password If you are connected the “inet addr” should be a 192.168.xxx.xxx IP address
# List the available WiFi networks

sudo nano /etc/wpa_supplicant/wpa_supplicant.conf

# Edit the WiFi configuration file

network={
    ssid="YOUR_WIFI_NETWORK"
    psk="WIFI_NETWORK_PASSWORD"
}

ifconfig wlan0

# You should see something that resembles this output

wlan0   Link encap:Ethernet HWaddr 74:da:38:2b:1c:3d
        inet addr:192.168.1.216 Bcast:192.168.1.255 Mask:255.255.255.0
        inet6 addr: fe80::8727:5526:a190:b339/64 Scope:Link
        UP BROADCAST RUNNING MULTICAST MTU:1500 Metric:1
        RX packets:6917 errors:0 dropped:229 overruns:0 frame:0
        TX packets:2931 errors:0 dropped:1 overruns:0 carrier:0
        collisions:0 txqueuelen:1000
RX bytes:10001000 (9.5 MiB) TX bytes:295067 (288.1 KiB)7.15.Software Preparation
Users control IoT end devices using the Streembit™ User Interface (UI) application and the Streembit™ IoT gateway. The IoT gateway acts as a bridge between the UI and the IoT end devices. That means the IoT gateway must provide an interface for incoming IoT requests. We do this via either the HTTP or HTTPS transport protocols, and the gateway listens for incoming connections using either HTTP or HTTPS.
7.15.1.When should I use the HTTPS protocol?
Currently, modern browsers increasingly enforce HTTPS. Many browser functionalities are only available via the HTTPS protocol. HTTPS on the UI side means that the IoT Gateway must use a domain name and third-party SSL certificate (modern browsers don’t support self-signed SSL certificates). Seeing the current trends, we feel the Gateway must support HTTPS connections. Also, many businesses and government organisations IT & security policies requires the use of SSL certificates. We aim to enable the gateway to operate where the security policies requires SSL certificates.
To set up the CLI so that it can communicate securely with https://www.streembit.co/ the user interface for IOT. It is important to understand that in order for the communication to function with the UI at the secure website of https://www.streembit.co
7.15.2.What are the requirements for the HTTPS configuration?
HTTPS requires a domain name and a third party signed SSL certificate.
7.15.3.Can I run the Gateway without a domain name and SSL certificate?
Yes, the gateway can be configured using the HTTP protocol without an SSL certificate. We understand many home/DIY users cannot manage domain names and SSL certificates. Also, domain names and SSL certificates introduce an additional level of dependency on registrars and DNS service providers. Streembit aims to create a peer-to-peer connection between users and IoT devices. Relying on domain name registrars and DNS providers contradicts the P2P idea to a certain extent.
7.15.4.Does the HTTP connection and lack of SSL certificate compromise security?
It actually does not. The Streembit™ IoT Gateway is configured with a unique PKI key pair. The UI user must know and configure the Gateway on the UI using the unique public key of the gateway. The identity of the gateway is verified via the PKI public key. Therefore the lack of SSL certificate do not compromise security. All transport packets are end-to-end encrypted on Streembit™ using PKI based ECDH or symmetric cryptography. The symmetric end-to-end encryption is AES256 and it uses 512-bit strong cryptography keys. Using the combination of PKI Network sniffers or third party observers/intruders unable to decipher the end-to-end encrypted messages. Using tested, robust and strong cryptography methods we can achieve military grade security on a home IoT network without SSL certificates.
7.15.5.So which configuration options should I use HTTP or HTTPS?
It is entirely depending on the user policies, preferences and capabilities. Both options can secure IoT devices adequately.
Options #1 and #2 of “step 1” below describe each configuration.
In “step 3” you will notice this command $ node streembit --pwd=PASSWORD You may notice that instead of PASSWORD you will need to create your own password which is compliant in length and has upper, lower case letters and a number at least.
Adding the user public key from your account at https://www.streembit.co/ requires to follow the user add detailed in step 3 below.
JSON code shows the config file – which needs the CMD set to true before running streembit cli on the raspberry pi to allow you to enter commands such as adding a user.
# having CMD set to true
{
  "database_name": "streembit",
  "cmdinput": true,
  "seeds": [
    {
      "host": "seed.streembit.uk",
      "port": 32319
    }
  ]
...
Fig 1. – Shows the UI view showing the public key which is needed to set up the user account on the CLI. The Public key is a long string of characters – in Fig 2 below it starts with 049085a5
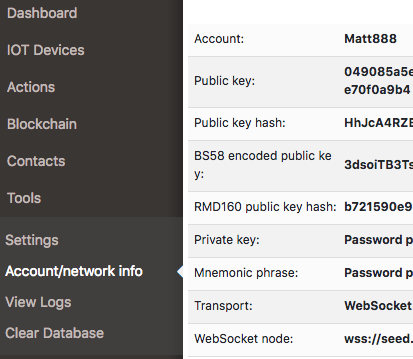
Follow the instructions carefully on step 4.
Fig 2. – Once you have got the relevant data you can then set up the IOT hub at UI https://www.streembit.co/
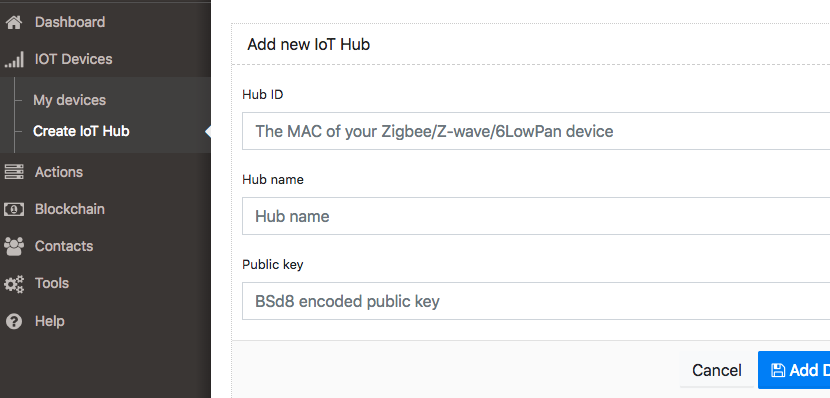
Below are some guidance notes on how to view and interpret the elements of the Config file and the consequences of inputting this data incorrectly.
7.15.6.Setting the flags
JSON you see shows how we are setting the flags
...
{
           "name": "iot",
           "run": true,
           "serialport": "/dev/ttySO",
...
Making sure the IOT module detailed above needs to be set to true on the config file. Also the “serialport” needs to match the naming convention of the Raspberry Pi serial port, which is listed above. On certain config file examples you may see it listed as “com 3” which is correct syntax for windows machines
The other modules in the config file then need to be set to false except for the following
* SSL = true * Client = true * NFC = true * Dns = true
7.15.7.Setting the mac address of the Zovolt Board
The config file requires the personalization of the Zovolt expansion board / Hat which is connected to the Pi via the usual serial block connector. This is done through the use of the mac address of the board and linked to the Zigbee radio chip on the board.
JSON you see shows an example on the IOT module of the config is shown below
...
"devices": [
               {
                   "type": 1,
                   "protocol": "zigbee",
                   "mcu": "xbee",
                   "id": "MAC_ID",
                   "name": "My Hub",
                   "permission": 1,
                   "details": {
                       "manufacturername": "ZoVolt",
                       "modelidentifier": "ZOVOLT-P2PIOTHUB-01",
                       "hwversion": "0001",
                       "protocol": "Zigbee",
                       "security": "ECC PPKI",
                       "NFC": true,
                       "endpoint": 2
                   }
               }
           ]
...
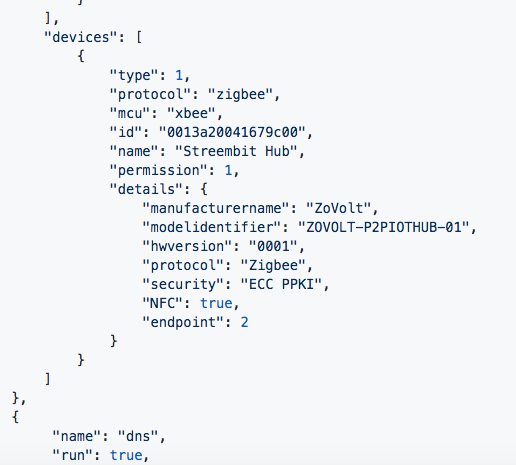
The key data item which need’s modifying on this config file for your specific board is
“Id” : “0013a20041679c00”,
The long string is the mac address of the board. Key to this information is to use lower case letters when editing the file. We find that despite the labels using upper case letters, the code relating to these identifiers for the mac address of the chip/board is most often lower case lettering. – creating a mismatch in upper and lower case lettering can create additional bugs and unpredictable operation of the CLI application.
7.15.8.Step 1
Option 1. With a domain and SSL certificates, via HTTPS.
The connection between the UI and the gateway are WSS and HTTPS. Therefore SSL certificates must be deployed and configured on the gateway. The configuration must be saved in the config.json file.
First obtain an SSL certificate for your domain name from a third party certificate provider. Include the certificate files in the ssl folder.
Required files
- CA: ssl/DOMAIN.ca-bundle.crt
- Certificate: ssl/DOMAIN.crt
- Key: ssl/DOMAIN.key
Adjust corresponding section in the configuration file to look like this:
# Option 1. with SSL
"transport": {
...
    "ssl": true,
    "ca": "ssl/DOMAIN.ca-bundle.crt",
    "cert": "ssl/DOMAIN.crt",
    "key": "ssl/DOMAIN.key"
}
Option 2. Without SSL, via HTTP
The transport section in config.json file must be configured the following:
# Option 2. Without SSL
"transport": {
...
    "ssl": false
}7.15.9.Step 2
Make sure you modify your config.json to resemble example above
For IoT the node: the transport.host field can be one of the following:
- IP address – type the valid public static IP address of your device. The Streembit UI will try to connect to the IoT node via this static public IP address.
- Domain name – type a domain name which DNS services is configured. The Streembit UI will connect to the IoT node via this domain name.
- “” – empty string. By configuring the device with this option and define an empty string i.e “”, the application will try to resolve the external (public) IP address of the device. The Streembit UI will connect to the IoT node via this resolved public IP address.
Notice that we are using domain names instead of IP addresses for the ssl cert configuration. This is important. Also there must be at least one valid seed, as well as run value in Client and IOT modules set to “true“. Please also note that the mac address listed in this config file is an example. You will need to use the mac address which is defined on the Zovolt board ‘Zigbee’ Radio chip.
7.15.10.Step 3
To allow connection to this IoT CLI instance, a user must be defined and saved in the CLI local database. In order to do this, open your Streembit UI, open “Tools” > “Account/network info” and copy the public key value. At the CLI to allow command prompt input set the “cmdinput” parameter to “true” or use “–cmd” flag.
# Start the app by entering
$ node streembit --pwd=PASSWORD
# or
$ node streembit --pwd=PASSWORD --cmd

# corresponding to a chosen way of initialization
# next, Enter
user
# then
add

# ... and follow the prompts you see on a screen

Public key is the only mandatory field and you should fill it with your PKI public key of your account set up which was copied from the Streembit UI.7.15.11.Step 4
Once the user is successfully added, stop the cli app. Open config.json and change “cmdinput” to false.
Copy the value of the BS58 public key of the hub (must be the last string of the output, or close to the last). At the Streembit UI you must add this Hub to your IoT Hub list. Click on the “IoT Devices” menu item and click on “Create IoT Hub”. Enter the IoT device ID. This is usually the Zigbee MAC of your device that sits top on the Streembit-cli Raspberry Pi (such as the Zovolt Zigbee gateway). Enter the device name and copy the BS58 public key of the streembit-cli that you gathered in the previous step. Click on Save and the web application should connect to your streembit-cli IoT instance. The created IoT Hub should appear on the devices view that is accessible from the “My devices” link.
# Restart the app with the following command
$ node streembit --pwd=PASSWORD --data
# Sample config file
{
   "database_name": "dbsql",
   "cmdinput": false,
   "seeds": [
        {
            "host": "seed.domain.se",
            "port": 32319
        }
   ],
   "transport": {
        "protocol": "http",
        "host": "",
        "port": 32319,
        "ws": {
            "port": 32320
        },
        "ssl": false,
        "ca": "PATH_TO/DOMAIN.ca-bundle.crt",
        "cert": "PATH_TO/DOMAIN.crt",
        "key": "PATH_TO/DOMAIN.key"
   },
   "limits": {
        "refresh": 3600,
        "replicate": 3600,
        "republish": 86400,
        "expire": 86405,
        "timeout": 5
   },
   "modules": [
       {
           "name": "seed",
           "run": false
       },
       {
           "name": "client",
           "run": true
       },
       {
           "name": "blockchain",
           "run": false
       },
       {
           "name": "iot",
           "run": true,
           "serialport": "/dev/ttySO",
           "protocols": [
               {
                   "name": "zigbee",
                   "chipset": "xbee"
               },
               {
                   "name": "zwave"
               },
               {
                   "name": "6lowpan"
               }
           ],
           "devices": [
               {
                   "type": 1,
                   "protocol": "zigbee",
                   "mcu": "xbee",
                   "id": "MAC_ID",
                   "name": "My Hub",
                   "permission": 1,
                   "details": {
                       "manufacturername": "ZoVolt",
                       "modelidentifier": "ZOVOLT-P2PIOTHUB-01",
                       "hwversion": "0001",
                       "protocol": "Zigbee",
                       "security": "ECC PPKI",
                       "NFC": true,
                       "endpoint": 2
                   }
               }
           ]
       },
       {
           "name": "dns",
           "run": true,
           "host": "IP_ADDRESS",
           "port": 8080
       }
   ],
   "log": {
       "level": "debug",
       "logs_dir": "logs"
   }
}